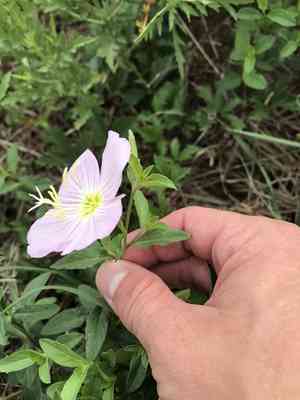
How to Prune Pinkladies?
A lively perennial recognized for its prolonged flowering season and resilience to dry conditions, pinkladies flourishes with little upkeep. Regularly remove faded blooms to stimulate further flowering and preserve a tidy look. Extensive trimming is best performed in early spring to foster robust development. Minor shaping can persist until late autumn. Refrain from significant pruning during the main blooming phase to safeguard the flowers. Advantages of pruning encompass improved plant health and extended floral presentations.
What Are the Benefits of Pruning Pinkladies?
What Are the Benefits of Pruning Pinkladies?
Trimming pinkladies promotes a more abundant flowering period, leading to more impressive displays. Regular cutting back helps pinkladies keep a compact shape and prevents excessive spreading, while also encouraging strong and vigorous development.
What Is the Best Time for Pruning Pinkladies?
What Is the Best Time for Pruning Pinkladies?
Early spring is considered optimal for pruning pinkladies as the plant is emerging from dormancy, and cutting back at this time stimulates new growth. This allows the gardener to shape the plant and encourages a fuller, more robust specimen before the main growing season. Pruning in late fall, after pinkladies has finished blooming and growth has slowed, is beneficial because it helps to prevent disease and pest issues that can arise in dead or dying plant material over the winter. Additionally, late fall pruning prepares pinkladies for vigorous growth the following spring. These seasons avoid disrupting pinkladies's natural flowering cycle, ensuring the gardener enjoys its blossoms throughout the blooming period.
What Tools Do I Need to Prune Pinkladies?
Hand Pruners
Given the size and delicate nature of pinkladies's stems, hand pruners are perfect for precise, clean cuts. They should be sharp and fit comfortably in your hand to allow for accurate snipping without harming nearby plant parts.
Pruning Shears
For trimming dead or overgrown stems, pruning shears are effective. Their bypass action makes them suitable for live plant material, promoting healthy growth without crushing the stems.
Gloves
Pinkladies does not have thorns, but gloves are recommended to protect your hands from potential skin irritants or minor scratches when reaching into the plant for pruning.
Pruning Saw
Although pinkladies rarely requires the use of a saw due to its relatively soft stems, a small pruning saw may be helpful for removing woody, mature sections if necessary.
Garden Scissors
For precision work and shaping of pinkladies, garden scissors can be utilized. They are less bulky than pruners and allow for meticulous control when thinning or deadheading.
How to Prune Pinkladies
Step1: Gathering Pruning Tools
Collect the necessary tools for pruning pinkladies, which include a pair of sharp, clean pruning shears or scissors, and optionally, gardening gloves to protect your hands.
Step2: Identifying Dead Flowers for Deadheading
Identify spent blooms on pinkladies to prepare for deadheading. Look for flowers that are wilted, brown, or faded and no longer attractive.
Step3: Snipping Off Dead Blossoms
Using your pruning shears, snip off the dead flowers just below the flower head, making the cut at a 45-degree angle. This helps to promote continued blooming and keeps pinkladies looking tidy.
Step4: Locating and Assessing Overgrown Stems
Locate overgrown stems on pinkladies that are spoiling the shape of the plant or encroaching on other plants. Overgrown stems are often longer than the rest and may have fewer leaves or flowers.
Step5: Trimming Overgrown Stems for Shape
Trim back the overgrown stems to the desired length, making cuts just above a leaf node or bud. Prune back to maintain the natural shape of pinkladies, with the goal of fostering a dense, even growth pattern.
Step6: Checking for Disease or Pests During Pruning
Inspect pinkladies for any signs of disease or pest infestation while pruning. Remove any diseased or infested parts of the plant by cutting well below the affected area to prevent spread.
Step7: Cleaning Tools Post-Pruning
After pruning, clean your tools to prevent the spread of disease. Disinfect your shears by wiping them with rubbing alcohol or a household disinfectant.
Step8: Disposing of Pruned Plant Material
Dispose of the pruned material properly, either by composting healthy plant parts or trashing diseased materials to avoid contaminating the compost or garden.
Step9: Watering Plant after Pruning
Water pinkladies after pruning to help the plant recover and to settle any soil disturbed by your activities.
Step10: Monitoring for New Growth Post-Pruning
Monitor pinkladies over the following weeks for new growth. Additional pruning may be necessary if new overgrown stems or dead flowers develop.
Post-Pruning Care for Pinkladies
Post-Pruning Care for Pinkladies
Immediately after pruning pinkladies, water the soil thoroughly to minimize transplant shock. Maintain slightly moist soil without waterlogging. Provide pinkladies with ample indirect sunlight; avoid direct, harsh sun. Keep the environment cool, ideally between 60-70°F with moderate humidity. Fertilize with a balanced, slow-release formula to encourage growth, but avoid over-fertilization. Regularly examine pinkladies for signs of stress, such as wilting or discolored leaves, and signs of infection, including unusual spotting or pests. Any negative changes should prompt prompt adjustments to care or consultation with a plant specialist.
Common Pruning Mistakes with Pinkladies
Incorrect Pruning Cut Placement
Cutting too far above or below the optimal pruning point can lead to unnecessary stress on pinkladies, potentially affecting its growth and blooming. The cut should be made just above a leaf joint where new growth can emerge.
Excessive Pruning
Over-pruning can shock pinkladies, hindering its ability to flourish. Gardeners should avoid removing more than one-third of the plant's growth to maintain its health and vigor.
Using Dull or Dirty Pruning Tools
Failing to use clean, sharp pruning tools can result in jagged cuts or the introduction of disease to pinkladies. It's crucial to sanitize tools before use to encourage clean cuts and prevent the spread of pathogens.
Not Removing Dead or Diseased Material
Neglecting to remove dead or diseased material from pinkladies can compromise the plant's overall health and aesthetic. Removing this material is essential for promoting healthy new growth.
Disregarding Plant's Natural Shape
Ignoring the plant's natural shape during pruning can result in an unnatural appearance and potentially impede natural growing patterns. Gardeners should aim to maintain the plant's form while pruning.
Common Pruning Tips for Pinkladies
Remove Dead or Diseased Stems First
Start by removing any dead, damaged, or diseased stems from pinkladies to maintain plant health and direct energy toward healthy growth.
Prune for Bushier Growth and More Blooms
Encourage bushier growth and more blooms by pruning just above a set of leaves or a branching point. This practice stimulates pinkladies to produce new growth, potentially leading to a fuller plant with more flowers.
Prune to Maintain Natural Shape and Health
Maintain the natural shape of pinkladies while pruning, focusing on creating an open center to allow light and air to penetrate the plant, which aids in reducing disease risk and encourages even flowering.
Light Pruning for Size and Shape Control
To control the size and spread of pinkladies, consider light pruning throughout the growing season. This encourages rejuvenation and helps maintain the desired form and size.
Fertilize After Pruning for Robust Growth
After pruning, applying a balanced, slow-release fertilizer can aid pinkladies's recovery and support robust growth. However, it's essential to follow recommended rates to avoid over-fertilization.


