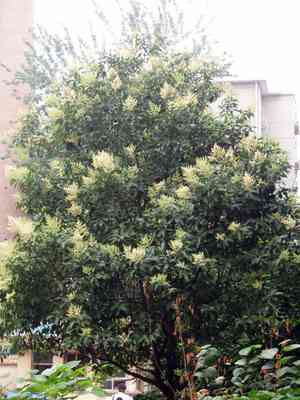
How to Prune Glossy privet?
Perfect for decorative barriers, Ligustrum lucidum needs consistent sculpting. Perform severe pruning in late winter prior to new development; remove aged branches and decrease thickness to enhance airflow. Shear the upper and lateral sections of the hedge to preserve its intended form. Trimming fosters more robust leaves and controlled expansion, crucial for sustaining its visual charm and preventing encroachment into adjacent areas.
What Are the Benefits of Pruning Glossy Privet?
What Are the Benefits of Pruning Glossy Privet?
Trimming glossy privet promotes vitality and maintains a neat form. Strategic cuts encourage strong new development, leading to a denser, healthier specimen. By regularly removing old or overgrown branches, glossy privet benefits from enhanced structure and appearance.
What Is the Best Time for Pruning Glossy Privet?
What Is the Best Time for Pruning Glossy Privet?
Pruning glossy privet from late winter to early spring is optimal as the plant remains dormant, minimizing stress and sap loss. This timing also allows gardeners to clear away any dead or diseased branches before the growing season, fostering healthier new growth. Additionally, since flowering occurs in summer, pruning during this window avoids cutting off flower buds, ensuring the bloom display is not compromised. This period also offers the chance to shape glossy privet, establishing a desired structure before active growth resumes. Pruning outside this season, especially during peak growth or immediately after flowering, can result in reduced blooms and a weakened structure, impacting the plant's overall health and look.
What Tools Do I Need to Prune Glossy Privet?
Hand Pruners
Perfect for cutting smaller branches up to 1/2 inch thick; ensures clean cuts for healthy regrowth.
Lopping Shears
Best suited for branches between 1/2 inch to 1 1/2 inches thick; provides leverage and helps reach higher branches.
Pruning Saw
Essential for cutting branches over 1 1/2 inches thick; allows for precision with larger limbs and minimizes damage.
Hedge Shears
Effective for shaping and maintaining the dense foliage of glossy privet; enables even trimming and aesthetic form.
Pole Pruner
Useful for higher branches that are out of reach; ensures safety while pruning without using a ladder.
How to Prune Glossy Privet
Step1: Health and Structure Assessment
Evaluate the overall health and structure of glossy privet before pruning. Look for diseased wood, old unproductive branches, and any suckers growing from the plant's base or roots.
Step2: Tool Sanitization
Begin by sanitizing your pruning tools with a solution of one part bleach to nine parts water, to prevent the spread of any diseases.
Step3: Diseased Branch Removal
Identify and remove any diseased branches first. Cut these branches back to healthy wood, making the cut at a 45-degree angle about 1/4 inch above a bud that faces outward from the plant's center.
Step4: Pruning Old Nonproductive Wood
Prune old wood that no longer produces vigorous growth or has become too dense. Thin out these branches to improve air circulation and light penetration to the center of glossy privet. Make cuts at the point of origin or to a lateral branch that is at least one-third the diameter of the cut branch.
Step5: Sucker Growth Removal
Remove suckers, which can deplete energy from glossy privet and lead to a less attractive form. Cut suckers as close to their point of origin as possible, ideally flush with the main stem or soil level without damaging the main bark.
Step6: Shape and Form Refinement
After removing the diseased, old, and sucker growth, step back to assess the shape of glossy privet. If additional shaping is necessary, selectively prune to maintain a pleasing form, ensuring to make cuts just above outward-facing buds.
Step7: Debris Cleanup
Clean up all pruning debris from around the base of glossy privet to prevent the spread of pests and diseases.
Step8: Post-Pruning Watering
Water glossy privet thoroughly after pruning to help the plant recover and seal the pruning cuts to prevent infection.
Step9: Fertilization
Apply a balanced, slow-release fertilizer around the base of glossy privet following watering, to provide essential nutrients that will aid in recovery and new growth.
Step10: Health Monitoring
Monitor glossy privet over the following weeks for signs of stress or disease. If the plant shows signs of poor health, consult a local cooperative extension service or professional arborist for additional care instructions.
Post-Pruning Care for Glossy Privet
Post-Pruning Care for Glossy Privet
Immediately after pruning glossy privet, water thoroughly to reduce stress. Ensure the plant is located in a spot with indirect light, and maintain consistent humidity and mild temperature to foster recovery. Apply a balanced fertilizer to replace lost nutrients and encourage growth. Regularly inspect glossy privet for signs of stress, such as wilted or discolored leaves, and infections indicated by unusual growths or lesions; if detected, treat promptly with appropriate fungicides or pest control measures. Adequate care post-pruning is critical for the plant's health and vitality.
Common Pruning Mistakes with Glossy Privet
Over-Pruning Damages Plant Health
Trimming too much of glossy privet at once, which can stress the plant and lead to weak growth or reduced vigor.
Improper Cutting Angles Risk Bark Damage
Cutting glossy privet's branches at improper angles or too close to the trunk, which can damage the bark and invite disease.
Neglected Removal of Dead Wood Hampers Growth
Failing to remove dead or diseased wood from glossy privet, which can hinder healthy growth and increase vulnerability to pests.
Dull Tools Cause Poor Healing Cuts
Using dull or dirty pruning tools on glossy privet, resulting in rough cuts that heal poorly.
Ignoring Dense Foliage Reduces Air and Light
Neglecting to thin out glossy privet's dense foliage, leading to poor air circulation and light penetration within the canopy.
Common Pruning Tips for Glossy Privet
Sharp Tools Ensure Clean Cuts and Disease Prevention
Use sharp and clean pruning tools to make clean cuts on glossy privet, helping to promote better healing and reduce disease transmission.
Cut Above Buds for Desired Growth Direction
When shortening glossy privet's branches, cut just above a bud that faces the direction you want new growth to follow, ensuring better shape and structure.
Improve Health with Thinning for Air and Light
Thoroughly thin out glossy privet's interior branches to enhance air circulation and light reach, which is essential for overall plant health and vigor.
Remove Crossed Branches to Prevent Disease
Remove any crossed, dead, or diseased branches from glossy privet to maintain a healthy framework and prevent the spread of pathogens.
Selective Pruning Boosts Vigorous Shoot Growth
Conduct selective pruning on glossy privet to encourage the growth of young, vigorous shoots while shaping the plant's overall form.


