How to Prune Japanese privet?
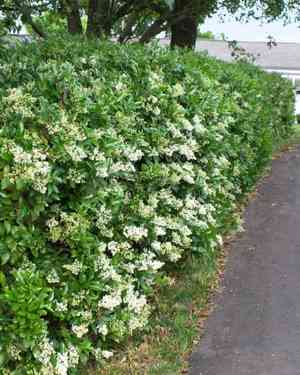
Renowned for its lustrous evergreen foliage and aromatic flower clusters, japanese privet flourishes with consistent trimming. Choose selective cuts to uphold its inherent form, and eliminate any lifeless, ailing, or intersecting limbs. The ideal period for pruning is in early spring or during winter, steering clear of the blooming season to safeguard the flowers. This practice stimulates robust development, enhances air circulation, and sustains the preferred dimensions. Particularly for japanese privet, pruning can additionally revitalize mature bushes, fostering new shoots.
What Are the Benefits of Pruning Japanese Privet?
What Are the Benefits of Pruning Japanese Privet?
Trimming japanese privet promotes robust development, enhances flower production, and aids in resistance to diseases and pests, ensuring a healthier plant with a controlled form and improved visual appeal.
What Is the Best Time for Pruning Japanese Privet?
What Is the Best Time for Pruning Japanese Privet?
Trimming japanese privet in early spring coincides with the end of its dormant phase, just before the start of the new growth cycle, enabling gardeners to shape the plant and encourage vigorous new growth without the risk of frost damage to fresh cuts. Winter is also suitable, especially for significant pruning, as the plant is inactive, reducing stress and the chance of pest infestation or disease entering through open wounds. Both periods avoid disrupting the late spring to summer blooming season of japanese privet, ensuring the plant's aesthetic and ecological contributions are maintained.
What Tools Do I Need to Prune Japanese Privet?
Hand Pruners
Crucial for making precise cuts on japanese privet branches up to 3/4 inch in diameter, hand pruners are effective for trimming small branches and shaping the plant.
Loppers
Perfect for cutting thicker branches, typically between 3/4 inch and 1 1/2 inches in diameter on japanese privet, loppers offer increased leverage and reach.
Hedge Shears
Japanese privet commonly used for shaping hedges and making straight cuts through softer, thinner branches. Useful for creating clean lines when shaping japanese privet as decorative hedges.
Pruning Saw
For branches exceeding 1 1/2 inches in diameter on japanese privet, a pruning saw is essential. It allows for clean cuts without harming larger limbs.
Pole Pruner
When japanese privet becomes too tall, a pole pruner assists in safely trimming higher branches from the ground without needing a ladder.
How to Prune Japanese Privet
Step1: Timing Pruning Season
Determine the optimal time for pruning. For japanese privet, late winter or early spring is ideal, prior to the emergence of new growth. Avoid pruning this plant in late fall, as new growth may be susceptible to frost damage.
Step2: Selecting Proper Pruning Tools
Gather the appropriate tools for pruning, including a pair of clean, sharp-handled pruning shears for small branches, loppers for medium-sized branches, and a pruning saw for large limbs.
Step3: Removing Dead Branches
Begin by eliminating any dead wood. Cut dead branches back to their origin or to a healthy outward-facing bud or lateral branch, ensuring cuts are clean and made at a 45-degree angle to prevent water accumulation and potential rot.
Step4: Cutting Away Damaged Wood
Next, prune damaged wood. Look for branches that are broken, diseased, or showing signs of decay. Make the cut just above a node or side branch, completely removing the damaged portion to maintain the health of japanese privet.
Step5: Thinning Overgrown Foliage
Thin out overgrown foliage to improve light and air penetration. Remove some of the older, larger branches from the center of japanese privet by cutting them at their base or point of origin. Do not remove more than one-third of the plant in a single season.
Step6: Shaping the Plant
Shape the japanese privet by lightly trimming the plant's external outline. Aim to preserve a natural growth habit unless a formal shape is desired. Cut back to just above a leaf or bud facing the direction you want new growth to take.
Step7: Refining Plant Silhouette
After pruning overgrown foliage, step back and assess the shape. Trim any irregularities or long shoots that disrupt the overall form of japanese privet, ensuring that the final shape is uniform and aesthetically pleasing.
Step8: Disposing of Pruning Debris
Discard all cuttings and debris to prevent the spread of disease and eliminate potential habitats for pests.
Step9: Sanitizing Pruning Equipment
Clean and sanitize your pruning tools after use to prevent the spread of disease to other plants. Use a solution of one part bleach to nine parts water to sanitize the tools effectively.
Step10: Aftercare for Recovery
Provide aftercare for japanese privet by watering and mulching around the base to help the plant recover from pruning stress. This will also encourage healthy, vigorous growth for the upcoming season.
Post-Pruning Care for Japanese Privet
Post-Pruning Care for Japanese Privet
Immediately after pruning japanese privet, ensure clean cuts to prevent infections. Place japanese privet in a location with indirect light to avoid sun scorch and maintain moderate humidity and temperature. Follow with a balanced, slow-release fertilizer to aid in recovery, but avoid over-fertilization. Water japanese privet adequately to keep the soil moist, not soggy. Monitor japanese privet regularly for wilting, discoloration, or signs of disease. Respond promptly to stress signals with suitable adjustments in care or treatment.
Common Pruning Mistakes with Japanese Privet
Over-Pruning or Under-Pruning
Cutting too much or too little: Gardeners often struggle with how much of japanese privet to prune away. Removing too much can stress the plant, while too little can result in a leggy, unshapely appearance.
Using Dull or Dirty Tools
Improper tool usage: Using dull or dirty pruning tools can damage the branches of japanese privet, leading to jagged cuts that make the plant prone to disease and pests.
Random or Improper Pruning
Pruning indiscriminately: Random or improper cuts can lead to poor plant structure or an unnatural look. It's important to prune with a clear objective, such as shaping or removing diseased wood.
Common Pruning Tips for Japanese Privet
Sanitize Pruning Tools
Sanitize the pruning tools before and after use to minimize the spread of diseases. Clean cuts help japanese privet heal faster and stay healthy.
Prune for Plant Structure and Health
Prune for structure and health by removing any dead, damaged, or diseased branches first. Look to create an open framework that allows light and air to penetrate, which boosts japanese privet's vitality and flowering potential.
Maintain Natural Form of Plant
When shaping japanese privet, maintain its natural form. Avoid over-pruning at the top to prevent the 'lollipop' effect. Regularly thinning out the center will encourage new growth and maintain an aesthetically pleasing shape.
Guide Growth with Directional Pruning
When shortening branches, make cuts just above a bud facing the direction you want new growth to go. This practice lets you guide the shape of japanese privet while promoting healthy, directional growth.
Proper Cut Placement Near Buds
Avoid leaving stubs or cutting too close to the main trunk, as both can cause unnecessary stress and potential issues for japanese privet. About a quarter-inch above a bud or branching point is ideal for clean healing.


