How to Prune Common rush?
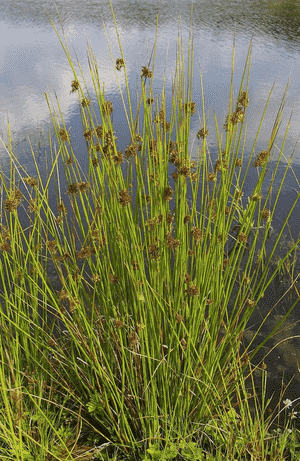
Distinguished by its tubular green stalks and preference for moist environments, Juncus effusus thrives with consistent trimming to preserve its form and vitality. Essential methods involve snipping the ends of stems to encourage denser development and eliminating any withered or compromised leaves. The most favorable period for pruning extends from early spring through late autumn, bypassing winter to protect nascent growth. Trimming boosts the plant's robustness and can avert excessive density, guaranteeing a neat look for this water-loving perennial.
Advantages of Trimming Common Rush
Advantages of Trimming Common Rush
Trimming common rush promotes robust development and helps maintain its form, ensuring a neat look and strong vitality.
Optimal Period for Pruning Common Rush
Optimal Period for Pruning Common Rush
The specified trimming periods are ideal for common rush as this is when the plant is actively developing. Pruning in early spring allows for the removal of any winter damage before new growth emerges. It also provides the plant with the necessary vigor to flourish during the growing season. Throughout summer and into late autumn, regular trimming can help maintain the desired shape and size, as well as encourage more robust growth. It's crucial to avoid pruning during winter when common rush is dormant, as this could lead to increased stress and vulnerability to cold weather damage. The recommended timing aligns with common rush's natural growth cycle, promoting overall health and ensuring the plant has ample time to recover before the onset of winter dormancy.
Required Tools for Pruning Common Rush
Sharp Shears or Hand Pruners
For precise cuts and to prevent crushing the stems of common rush, sharp shears or hand pruners are essential. These tools enable clean cuts that facilitate better healing and reduce disease risk.
Long-Handled Clippers
Given that common rush can grow in dense clusters, long-handled clippers can be useful for reaching into the center of clumps without harming surrounding vegetation. They also provide leverage for thicker stems.
Gardening Gloves
To protect hands from the rough and potentially sharp edges of common rush stems, gardening gloves are necessary. This personal protective equipment ensures a safer pruning experience.
How to Prune Common Rush
Step1: Identifying Unhealthy Stems
Identify dead or damaged stems on common rush by looking for brown, withered, and brittle textures as opposed to the green and flexible healthy stems.
Step2: Sanitizing Pruning Implements
Use clean, sharp scissors or pruning shears to make clean cuts. Disinfect the blades with isopropyl alcohol before starting and between cuts if pruning multiple common rush plants to prevent disease spread.
Step3: Removing Dead Stems
Cut the dead stems at the base, close to the ground level, taking care not to pull or tear as this can damage the plant's root structure.
Step4: Locating Spent Blooms
Locate spent flower stalks, which can be recognized by their dried and faded appearance compared to the darker healthy green of new growth.
Step5: Trimming Spent Flower Stalks
Prune the spent flower stalks at their base, similar to the dead stems, ensuring a clean cut without affecting the newer flower shoots that may be developing.
Step6: Disposing of Clipped Material
After pruning, collect all the trimmed material and discard it away from the garden to prevent any potential disease or pest issues from affecting other plants.
Step7: Reshaping Remaining Stems
Lightly reshape the remaining stems for aesthetic purposes, if necessary, to maintain a natural look, but avoid significant cutting back as common rush plants have a clumping growth habit.
Step8: Watering After Pruning
Water the common rush after pruning, if the soil is dry, to help reduce stress and support the plant in its recovery.
Step9: Monitoring Plant Recovery
Monitor the common rush over the following weeks, checking for new growth and ensuring that there is no sign of disease at the cut sites.
Post-Pruning Care for Common Rush
Post-Pruning Care for Common Rush
Following pruning, common rush requires thorough watering to reduce stress. Place in partial shade to avoid direct sunlight, ensuring high humidity and stable temperatures. Apply balanced, slow-release fertilizer to replenish nutrients, promoting recovery and growth. Regularly inspect common rush for signs of stress, such as yellowing leaves or wilting. If symptoms persist, assess moisture levels and adjust care. Quarantine promptly if infection signs like unusual spots or decay appear, applying appropriate fungicides or bactericides as needed.
Common Pruning Errors with Common Rush
Excessive Pruning Harms Health
Pruning back too aggressively can negatively impact the health of common rush. This species thrives when allowed to grow densely but can suffer if too much of the plant is removed at once.
Disease Risk from Dull Tools
Using blunt or dirty tools can introduce diseases to common rush or cause jagged cuts that do not heal well. This can weaken the plant and lead to pest issues.
Harming Growth by Cutting Green Shoots
Removing living green shoots instead of focusing on dead or yellowing foliage can hinder the natural growth cycle of common rush, leading to less vigorous plants.
General Pruning Advice for Common Rush
Trim Dead Foliage with Sharp Tools
Use sharp, clean pruning shears or scissors to trim away only the yellow or brown, dead foliage of common rush, which encourages healthy growth and maintains an attractive appearance.
Cut Base of Foliage to Avoid Stubs
Cut at the base of the dead foliage, close to the ground level, to avoid leaving unsightly stubs that could detract from the plant's natural form.
Thin Dense Clumps for Better Health
Thinning out the center of dense clumps of common rush can improve air circulation and light penetration, supporting overall plant health without compromising its structure.


