How to Prune Silky oak?
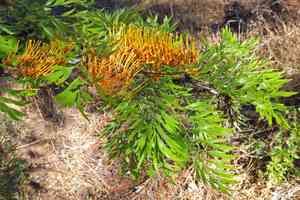
A rapidly developing evergreen arboreal species, Grevillea robusta can attain considerable stature, characterized by its fern-like foliage and vibrant golden-orange blossoms. Undertake trimming to preserve its form and vitality by excising impaired or intersecting limbs and managing its dimensions. Execute foundational pruning in its initial stages to cultivate a robust framework. The most suitable period for pruning is winter, during its inactive phase, to mitigate sap exudation and physiological strain. Advantages of pruning encompass better air movement, increased light exposure, and augmented blooming capacity.
What Are the Benefits of Pruning Silky Oak?
What Are the Benefits of Pruning Silky Oak?
Trimming silky oak promotes robust development and preserves its attractive form. Strategic cutting enhances air movement and light exposure, crucial for the species' well-being and shape retention.
What Is the Best Time for Pruning Silky Oak?
What Is the Best Time for Pruning Silky Oak?
Winter is considered ideal for pruning silky oak because the plant is typically in a dormant state. Pruning during dormancy minimizes stress on silky oak, as its growth cycle is paused and it's not expending energy on active development. This timing also allows for better wound healing before the spring growth surge, reducing infection and disease risk. Additionally, without leaves, silky oak's structure is more visible, simplifying strategic cuts. Pruning before spring growth also ensures the plant's energy is directed towards producing new, healthy growth, rather than sustaining damaged or unnecessary branches.
What Tools Do I Need to Prune Silky Oak?
Hand Pruners
Crucial for making precise cuts on smaller branches of silky oak, ensuring minimal harm to plant tissues.
Loppers
Perfect for cutting thicker branches that hand pruners can't manage, offering sufficient leverage and reach for silky oak's denser foliage.
Pruning Saw
Required for removing large branches from silky oak, especially when reshaping or controlling the plant's size.
Pole Pruner
Helpful for reaching higher branches without needing a ladder, making silky oak pruning safer and more efficient.
Gloves
Important for safeguarding the gardener's hands from silky oak's foliage, which might cause irritation or scratches.
How to Prune Silky Oak
Step1: Inspect for Pruning Needs
Thoroughly examine silky oak to identify dead limbs, diseased wood, crossing branches, spindly growth, and epicormic shoots. This will guide the pruning process and ensure healthy development.
Step2: Sanitize Pruning Tools
Disinfect your pruning tools before starting to prevent disease spread. Use a solution of 1 part bleach to 9 parts water to clean cutting surfaces.
Step3: Time Pruning with Dormancy
Begin pruning in late winter to early spring, as silky oak is dormant then and can recover better. Avoid pruning when the tree is actively growing in late spring and summer.
Step4: Remove Dead Limbs
First, remove dead limbs. Identify dead wood by its lack of leaves, brittle nature, and discolored appearance. Cut dead limbs where they meet a larger branch or the trunk, making a slight angle cut to prevent water collection on the wound.
Step5: Eliminate Diseased Wood
Identify and remove diseased wood, which may show discoloration or fungal growth. Cut several inches into healthy wood beyond the affected area to ensure all diseased material is gone.
Step6: Prune Crossing Branches
Prune crossing branches that are rubbing or likely to rub together. Choose the branch that contributes least to the tree's shape and health and remove it at its base, where it connects to another branch or the trunk.
Step7: Trim Spindly Growth
Cut back spindly growth to encourage silky oak to develop stronger, more robust limbs. Locate thin, weak branches and trim them back to a main branch or the trunk, using clean cuts angled away from the remaining branch to promote good water runoff.
Step8: Remove Epicormic Shoots
Remove epicormic shoots, which are small sprouts growing from the trunk or old branches. These can drain energy from silky oak and create a cluttered look. Prune them flush with the trunk or parent branch, ensuring no stubs are left.
Step9: Shape the Plant
Prune silky oak for shape if needed, shortening overextended branches to maintain the desired tree form. Always make shaping cuts just above an outward-facing lateral bud or branch to encourage healthy regrowth in a favorable direction.
Step10: Final Pruning Check
Perform a final inspection for any remaining problem areas and make necessary additional cuts, following the above steps to ensure silky oak's future health and growth.
Step11: Dispose of Pruning Waste
Discard all pruned material, especially diseased wood, to prevent potential disease spread in the garden or compost heap.
Step12: Post-Pruning Care
Water silky oak after pruning to aid recovery, and apply a layer of mulch around the base to help retain moisture and regulate soil temperature.
Step13: Monitor Post-Pruning
Monitor silky oak over the subsequent weeks for signs of new growth and recovery, and for potential issues like disease or pest infestations that may arise in response to pruning.
Post-Pruning Care for Silky Oak
Post-Pruning Care for Silky Oak
After trimming silky oak, promptly water the plant to lessen stress. Maintain a humid, but not soggy, environment to encourage recovery, keeping silky oak in bright, indirect light and at consistent temperatures. Apply a balanced, slow-release fertilizer to support new growth. Regularly check for wilting leaves or dieback, which could signal stress or infection. If signs appear, adjust care and consult an expert if needed. Ensure the pruned area is clean to prevent disease.
Common Pruning Mistakes with Silky Oak
Avoid Dull and Dirty Pruning Tools
Using dull or dirty tools can harm silky oak and spread disease. It's essential to use clean, sharp tools for clean cuts that heal quickly.
Do Not Prune Too Close to Trunk
Pruning too close to the main trunk or branches. This can create wounds vulnerable to pests and diseases. Always leave a small stub when removing branches.
Limit Foliage Removal to One-Third
Removing excessive foliage can stress silky oak, leading to poor growth or reduced flowering. Generally, no more than one-third of the canopy should be removed at a time.
Avoid Tearing Bark During Pruning
Tearing the bark while pruning. Cuts should be made carefully to prevent damage to the bark, which can compromise the plant's health.
Prune with Purpose, Not Randomly
Pruning without a clear objective, such as removing dead wood or shaping the plant. Random cuts can result in unattractive growth and a weakened structure.
Common Pruning Tips for Silky Oak
Remove Dead or Diseased Branches
Identify and remove any dead, damaged, or diseased branches to maintain silky oak's health. This helps prevent disease spread and encourages more vigorous growth.
Thinning for Better Air and Light
Utilize the thinning method to improve air circulation and light penetration throughout the canopy, which are vital for silky oak's health and flowering.
45-Degree Angle Cuts Above Nodes
Make cuts at a 45-degree angle just above an outward-facing leaf node or bud. This encourages new growth in a desirable direction away from the center of silky oak.
Prune to Maintain Natural Shape
Maintain silky oak's natural shape by following its growth pattern when pruning. Overly aggressive shaping can lead to poor growth and diminish the plant's inherent beauty.
Apply Wound Dressing to Large Cuts
After pruning, apply a wound dressing to large cuts to protect silky oak from pests and diseases. However, for smaller cuts, this is usually unnecessary as silky oak can heal those naturally.


