How to Prune Velvet ash?
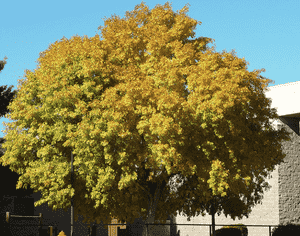
A deciduous tree prized for its abundant leaves and versatility, velvet ash flourishes with appropriate trimming. Essential methods involve reducing dense limbs, eliminating deceased or ailing timber, and forming for framework. Trimming ought to happen in late winter or early spring to stimulate vigorous new development. For velvet ash, trimming guarantees sufficient sunlight access and air movement, vital for strong well-being. Refrain from severe cutting to safeguard the tree's inherent shape and durability.
What Are the Benefits of Pruning Velvet Ash?
What Are the Benefits of Pruning Velvet Ash?
Trimming velvet ash promotes robust new growth and helps maintain its desired shape. Strategic cutting fosters a strong structure, which can extend the tree's lifespan and improve its visual appeal.
What Is the Best Time for Pruning Velvet Ash?
What Is the Best Time for Pruning Velvet Ash?
During late winter and early spring, velvet ash is in its dormant state, prior to the emergence of new foliage. Pruning at this time minimizes stress on the plant, as cuts have ample time to heal before the growing season. Furthermore, the absence of leaves offers clearer visibility of the plant's structure, allowing for more precise pruning. Avoiding active growth and warmer periods reduces the risk of disease and insect infestations at cut sites. This timing also ensures flower buds are not removed, preserving velvet ash's flowering potential.
What Tools Do I Need to Prune Velvet Ash?
Hand Pruners
For young or slender branches of velvet ash, typically under 0.5 inches in diameter, hand pruners deliver clean cuts that encourage healthy development.
Loppers
When addressing branches between 0.5 and 2 inches thick, loppers provide the necessary leverage to prune velvet ash without harming the branch or the plant.
Pruning Saw
For mature branches exceeding 2 inches in diameter, a pruning saw is indispensable. The saw should be sharp and comfortable to hold for efficient cutting.
Pole Pruner
For higher branches of velvet ash that are out of reach, a pole pruner enables safe trimming from the ground, eliminating the need for a ladder.
How to Prune Velvet Ash
Step1: Inspect Plant for Damaged Growth
Examine velvet ash for any indications of dead wood, diseased limbs, and weak branches. These sections typically appear discolored, lack leaves, or show clear signs of infection or decay.
Step2: Prepare Clean Pruning Equipment
Gather the appropriate pruning tools such as bypass shears for thin branches, loppers for medium-sized branches, and a pruning saw for thicker limbs. Ensure all tools are cleaned and sanitized to prevent disease transmission.
Step3: Cut Dead Wood at a 45-Degree Angle
Begin pruning velvet ash by removing dead wood. Make precise cuts at a 45-degree angle just above a healthy bud or branch. Ensure the cutting points are not too close to the bud to avoid damaging it.
Step4: Remove Diseased Limbs Completely
Identify and remove diseased limbs on velvet ash. Cut well past the affected area into healthy wood to guarantee complete disease eradication. Promptly dispose of the diseased material to prevent spread.
Step5: Prune Weak Branches at Origin
Trim away weak branches on velvet ash that have narrow attachment angles, as these are more susceptible to breakage. Cut back to their point of origin or to a strong lateral branch.
Step6: Assess Plant Structure for Shaping
After removing dead, diseased, and weak branches, step back and evaluate velvet ash for shaping. Aim for a balanced structure, keeping the tree's natural form in mind.
Step7: Thin Dense Canopy for Health
Thin out velvet ash's canopy if it is overly dense. This involves selectively removing branches to improve light penetration and air circulation, which lowers the risk of diseases.
Step8: Ensure Smooth Cuts for Healing
Make all final cuts on velvet ash smooth and clean to encourage quick healing. Avoid leaving stubs or ragged edges as these can be entry points for pests and diseases.
Step9: Disinfect Tools Post-Pruning
Clean all tools used to prune velvet ash to prevent the spread of disease to other plants. Disinfect tools with a solution of 1 part bleach to 9 parts water.
Step10: Provide Post-Pruning Plant Care
After pruning velvet ash, provide care by watering and mulching appropriately to support recovery and vigorous growth.
Post-Pruning Care for Velvet Ash
Post-Pruning Care for Velvet Ash
Immediately after pruning velvet ash, ensure clean cuts to promote rapid healing, and apply a water-based sealant if needed. Adjust watering to keep soil moist, not saturated. Place velvet ash in moderate light, avoiding direct sun; maintain ambient temperatures and moderate humidity. Apply a balanced fertilizer to aid recovery, reducing nitrogen levels to minimize stress. Regularly inspect for wilting or discolored leaves, indicating stress or infection. If symptoms persist, consult an arborist to address potential diseases. Proper care supports velvet ash's health and vigor post-pruning.
Common Pruning Mistakes with Velvet Ash
Avoid cutting near trunk to protect collar and healing
Cutting too close to the main trunk, which can harm the collar (the swollen area where the branch meets the trunk) and impede velvet ash's natural healing process.
Donât remove excessive foliage at once to prevent stress
Removing too much foliage simultaneously, which can stress velvet ash and diminish its vitality and ability to photosynthesize effectively.
Make clean cuts, not jagged, to reduce injury and pests
Making ragged or torn cuts, which can cause unnecessary injury to velvet ash and attract pests and diseases.
Sterilize tools before pruning to avoid spreading diseases
Pruning without first sanitizing the tools, which can spread diseases from infected plants to healthy ones, including velvet ash.
Cut branches without leaving stubs to deter decay and pests
Leaving stubs when cutting branches, which can lead to decay and provide entry points for pests and diseases.
Common Pruning Tips for Velvet Ash
Use sharp tools for angled cuts to prevent disease
Utilize clean, sharp tools to make precise cuts at a 45-degree angle away from the bud, to encourage water runoff and prevent disease in velvet ash.
Remove dead or damaged branches to improve health and shape
Identify and eliminate any dead, damaged, or diseased branches first, which will help maintain velvet ash's overall health and aesthetic form.
Cut outside branch collar for quick healing and decay prevention
Cut just outside the branch collar, not flush with the trunk, to promote faster healing and reduce the risk of decay in velvet ash.
Thin interior branches for better air flow and light access
Practice thinning to remove interior branches and allow improved air circulation and light penetration, which will bolster velvet ash's health and growth.
Maintain natural shape and avoid over-pruning
Preserve the natural shape of velvet ash by following its branch patterns and avoiding excessive pruning - the goal is to enhance, not alter.


