How to Prune Oregon ash?
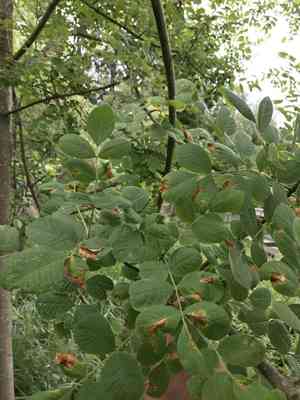
This deciduous species flourishes in moist environments, displaying compound foliage and grayish, deeply grooved bark. Essential pruning methods for oregon ash involve excising deceased or ailing limbs, thinning the canopy to facilitate light penetration and air circulation, and decreasing its stature or breadth to control its dimensions. The most favorable periods for pruning are late winter to early spring, while the tree is dormant and prior to sap ascent. Trimming oregon ash can boost the tree's well-being and robustness, lessen the likelihood of disease dissemination, and sculpt its appearance.
What Are the Benefits of Pruning Oregon Ash?
What Are the Benefits of Pruning Oregon Ash?
Trimming oregon ash encourages vigorous development and maintains its desired shape. This helps ensure a robust structure, lowering disease risk and improving visual appeal.
What Is the Best Time for Pruning Oregon Ash?
What Is the Best Time for Pruning Oregon Ash?
Pruning oregon ash from late winter to early spring is beneficial because the plant is inactive then. This timing minimizes sap loss, which can attract pests and diseases. It also reduces stress on oregon ash, allowing it to recover more efficiently and direct energy to new growth as the active season begins. Trimming before the spring growth surge means wounds close faster, and the plant can focus energy on producing new shoots, leaves, and potentially flowers or seeds. Additionally, without foliage, the structure of oregon ash is more visible, enabling more precise and effective pruning.
What Tools Do I Need to Prune Oregon Ash?
Hand Pruners
Perfect for severing small branches up to 1 inch in diameter. Oregon ash's young shoots and smaller limbs can be easily managed with this tool, ensuring clean, accurate cuts without harming the plant.
Loppers
These are vital when dealing with branches between 1 and 2 inches in diameter. Given oregon ash's potential for medium-sized limbs, loppers offer the necessary leverage for thicker cuts while being easy on the user.
Pruning Saws
For branches exceeding 2 inches in thickness, a pruning saw is indispensable due to the mature size oregon ash can attain. This saw allows gardeners to cut through larger branches cleanly, which is crucial for the plant's health.
Pole Pruners
Useful for reaching elevated branches without needing a ladder. Oregon ash can grow quite tall, so a pole pruner is suitable for maintaining the canopy and safely removing higher, unnecessary limbs from the ground.
Hedge Shears
Effective for shaping and controlling new growth in a formal hedge setting if oregon ash is utilized in such a way. These shears enable quick, uniform trimming of multiple small shoots.
Personal Protective Equipment
Gloves, goggles, and protective clothing are essential for safe pruning, as they shield the user from potential scratches or injuries while working on oregon ash.
How to Prune Oregon Ash
Step1: Timing Dormant Pruning
Determine the optimal period to prune oregon ash, which is late winter or early spring before the leaf buds begin to swell. Dormant pruning minimizes disease transmission risk and won't hinder upcoming growth.
Step2: Prepare Sterilized Pruning Tools
Gather the necessary tools for trimming. Hand pruners, loppers, and a pruning saw should be disinfected with a 10% bleach solution or rubbing alcohol to prevent disease spread.
Step3: Deadwood Identification
Inspect oregon ash for deadwood, identifying lifeless, brittle branches with no green tissue when scraped. These should be removed to maintain plant health and safety.
Step4: Proper Cutting Technique
When removing deadwood, make clean cuts just above a healthy bud, branch junction, or the branch collar. Avoid leaving stubs, which can encourage pests and disease.
Step5: Diseased Wood Detection
Examine oregon ash for any signs of diseased wood, which may include discolorations, cankers, or abnormal growths. It is vital to prune these areas to prevent disease spread.
Step6: Remove Diseased Wood Safely
Prune any diseased wood by making cuts at least several inches below the affected area, ensuring you're cutting into healthy tissue. Disinfect your pruning tools after each cut using a 10% bleach solution or rubbing alcohol.
Step7: Address Broken Branches
Next, check for broken branches that may have occurred due to weather damage or other factors. These can pose safety hazards and entry points for disease.
Step8: Trimming for Health and Safety
Trim back broken branches to the nearest healthy wood, just above a lateral branch or a bud that faces the outside of the plant, promoting better airflow and sunlight penetration.
Step9: Prevent Branches Rubbing
After removing dead, diseased, and broken branches, step back to assess oregon ash's shape. Remove any branches that are crossing or rubbing against each other to prevent wounds.
Step10: Thinning Canopy for Airflow
Thinning out the canopy of oregon ash ensures proper air circulation and sunlight penetration. Selectively remove some inner branches throughout the canopy, taking care not to remove more than 25% of the living branches in one year.
Step11: Cleanup to Prevent Disease
Once pruning is complete, clear all debris from around oregon ash, as fallen leaves and wood can harbor pests and diseases.
Step12: Avoid Excessive Pruning
Avoid drastic pruning measures such as topping, as this can be detrimental to oregon ash. If reduction is necessary, consult a professional arborist.
Post-Pruning Care for Oregon Ash
Post-Pruning Care for Oregon Ash
After trimming oregon ash, ensure immediate wound treatment by applying a sealant to prevent disease entry. Optimize the environment by providing partial sun, maintaining moderate humidity, and keeping temperatures stable. Begin a balanced fertilization regimen after three weeks to support recovery and growth. Monitor oregon ash closely for wilting or discoloration, as these indicate stress or infection. If symptoms appear, promptly use fungicides or pesticides as needed, and adjust care practices to address any environmental stresses.
Common Pruning Mistakes with Oregon Ash
Avoid Over-Pruning and Removing Too Much Tissue
Excessive pruning can lead to undue stress for oregon ash, potentially hindering its growth or causing dieback. Removing more than one-fourth of the tree's living tissues in a single season is generally too much.
Sterilize Tools to Prevent Disease Transmission
Failing to sterilize pruning tools between cuts, especially when moving between different plants, can spread diseases to oregon ash, impacting its health.
Proper Cutting Techniques for Healthy Wounds
Making incorrect cuts, like leaving stubs or cutting too close to the trunk, can result in poor wound healing and create entry points for pests and diseases.
Common Pruning Tips for Oregon Ash
Remove Dead or Diseased Wood for Plant Health
Identify and remove any dead or diseased wood first, as this cleanup helps maintain the overall health and appearance of oregon ash.
Correct Angle Cuts Promote Outward Growth and Prevent Decay
Cutting at the proper angle, just above an outward-facing bud or branch, encourages outward growth and prevents water accumulation on the cut surface, which can lead to decay.
Thinning Interior Branches Enhances Airflow and Light Access
When thinning oregon ash, focus on removing interior branches that are crossing or rubbing against each other to improve air circulation and light penetration, essential for robust growth.


