How to Prune Wintercreeper?
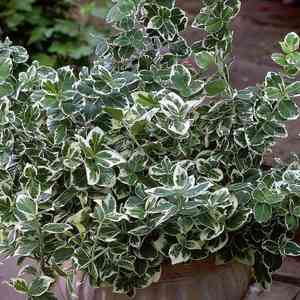
This robust, perennial vine, recognized for its capacity to adorn fences and barriers, thrives with consistent trimming to preserve its form and dimensions. For Euonymus fortunei, perform pruning in late winter or early spring prior to the emergence of fresh shoots. Sever any excessively long or undesirable limbs, and eliminate deceased or ailing timber. Reducing the density of crowded sections improves air movement, thereby boosting the plant's well-being. Trimming additionally fosters a more contained growth pattern and can deter Euonymus fortunei from spreading aggressively.
What Are the Benefits of Pruning Wintercreeper?
What Are the Benefits of Pruning Wintercreeper?
Trimming wintercreeper promotes robust development and maintains its desired form, ensuring the plant's vigor and visual appeal.
What Is the Best Time for Pruning Wintercreeper?
What Is the Best Time for Pruning Wintercreeper?
These periods are considered ideal for trimming wintercreeper because in late winter, the plant remains dormant, minimizing stress and the risk of disease infection that can occur with pruning. Pruning before the emergence of new growth in early spring allows the gardener to shape the plant and remove any dead or damaged branches, directing the plant's energy into producing strong, healthy new growth as the active season begins. Furthermore, since wintercreeper lacks a significant flowering season to consider, pruning can be performed without the concern of removing flower buds, which is an issue for other ornamental plants. These timings ensure the plant retains its desired look and vitality, without negatively impacting its overall health and growth cycle.
What Tools Do I Need to Prune Wintercreeper?
Hand Pruners
Perfect for making precise cuts on wintercreeper, these instruments enable gardeners to shape the plant and eliminate small, unwanted branches. The bypass type is recommended for its clean and healthy cuts.
Lopping Shears
Most effective for cutting through thicker stems and branches of wintercreeper, especially in dense areas where greater leverage is required for clean cuts.
Hedge Shears
Useful for trimming and shaping wintercreeper when creating hedges or maintaining a formal look. Their longer blades can cut multiple stems simultaneously.
Pruning Saw
Essential for removing larger branches from wintercreeper that hand pruners and lopping shears cannot manage, ensuring a smooth cut without harming the plant.
Gloves
Protection against scratches and sap, ensuring safety while trimming wintercreeper.
Cleaning Solution
To prevent disease transmission, tools should be cleaned after use on wintercreeper, particularly if the plant exhibits signs of illness or pests.
How to Prune Wintercreeper
Step1: Timing Pruning for Plant Recovery
Start trimming wintercreeper in late winter or early spring before new growth begins. This timing helps the plant recover quickly without exposing new foliage to potential harm.
Step2: Sanitize Tools to Prevent Disease
Disinfect your pruning tools with rubbing alcohol or a 10% bleach solution to prevent the spread of diseases.
Step3: Identify and Prune Dead Wood
Identify dead wood by looking for branches that lack green foliage, are brittle, and break easily. These can be removed at any time of the year to maintain plant health and appearance.
Step4: Technique for Cutting Dead Braches
Cut dead wood back to the point where it meets healthy, living tissue. Use clean, sharp, bypass pruning shears and make the cut at a 45-degree angle to encourage water runoff and reduce the risk of disease.
Step5: Thin for New Growth and Shape
Trim older branches to thin out wintercreeper and encourage new growth. Select several of the oldest and largest branches, ensuring they are spaced out evenly throughout the plant to maintain an aesthetically pleasing shape.
Step6: Proper Cutting of Old Branches
Cut the older branches at their base, near the main trunk or a primary branch, without leaving stubs. This promotes better healing and redirects energy to younger, more vigorous branches.
Step7: Remove Diseased Plant Parts
Inspect wintercreeper for any signs of disease such as discoloration, unusual spots, or growths. It's crucial to remove these diseased parts to prevent the infection from spreading.
Step8: Precise Removal of Infected Tissue
When cutting out diseased parts, make the cuts well into the healthy tissue, several inches below the diseased area. Dispose of these parts properly, avoid composting them as they may carry infectious agents.
Step9: Shape and Size Adjustment
After pruning for health, observe wintercreeper's overall shape and size. If additional shaping is required, selectively trim branches to improve the form and density of the plant without over-pruning.
Step10: Respect Plant's Natural Growth
Maintain wintercreeper's natural growth habit by avoiding excessive topping or shearing unless forming a hedge. Prune selectively and consider the plant's expected mature size and form to reduce the need for future corrective pruning.
Step11: Tool Maintenance Post-Pruning
Clean your tools after finishing to remove any plant residue that could harbor disease. Sharpen the blades if necessary to ensure they are ready for the next use.
Step12: Monitor Plant Health Post-Pruning
Monitor wintercreeper after pruning for signs of new growth and overall health. Ensure the plant receives appropriate care, including water, fertilizer, and mulch, to support its recovery and vigour.
Post-Pruning Care for Wintercreeper
Post-Pruning Care for Wintercreeper
After trimming wintercreeper, begin care with thorough watering to alleviate stress. Manage light exposure by placing wintercreeper in filtered sunlight; avoid intense direct sun. Maintain moderate humidity and temperatures, steering clear of extremes. Fertilize lightly with a balanced, slow-release formula to aid recovery without overstimulating growth. Monitor wintercreeper for wilting, discoloration, or infection signs. At any distress indicators, isolate wintercreeper, and adjust care or consult a plant disease expert for appropriate treatment.
Common Pruning Mistakes with Wintercreeper
Over-pruning and Stressing Plant
Removing too much foliage at once, which can stress wintercreeper and lead to poor growth or vulnerability to pests and diseases.
Improper Cuts on Woody Stems
Cutting into older, woody stems without a clear purpose, which may damage the plant's structure and impede its natural shape.
Not Disinfecting Pruning Tools
Neglecting to clean pruning tools before and after use, risking the spread of disease between plants.
Making Jagged Cuts and Tearing Stems
Making jagged cuts or tearing stems, which can lead to uneven healing and create entry points for pathogens.
Unassessed Pruning and Poor Shaping
Pruning without assessing the plantâs overall health and growth pattern, which can result in an unbalanced and aesthetically unpleasing shape.
Common Pruning Tips for Wintercreeper
Clean Cuts with Sharp Shears
Use sharp, clean pruning shears to make clean cuts that heal quickly, reducing the risk of disease.
Thinning for Better Air Circulation
Thin out crowded areas to improve air circulation, which helps in preventing fungal diseases common in wintercreeper.
Shaping and Trimming for Desired Form
Prune to shape wintercreeper according to the desired form, trimming back overgrown shoots to maintain a neat appearance.
Pruning toward Healthy Buds for Controlled Growth
Cut back to a healthy bud pointing in the direction you wish new growth to follow, promoting a more controlled shape.
Fertilizing After Pruning for Plant Health
After pruning, apply a balanced fertilizer to support the health of wintercreeper and promote vigorous new growth.


