How to Prune Crimson bottlebrush?
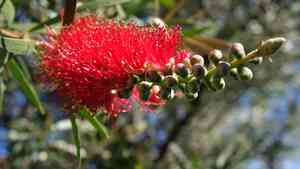
Renowned for its vivid scarlet, brush-like blossoms, Callistemon benefits from trimming that encourages development and floral output. Perform pruning directly following the blooming period to sculpt and control its dimensions. Eliminate faded blooms, lifeless wood, and thin out congested limbs, preferably in the latter part of spring or early summer, to improve the plant's well-being and deter excessive growth. Strategic pruning also fosters abundant flowering in the subsequent period and aids air circulation within the foliage.
What Are the Benefits of Pruning Crimson Bottlebrush?
What Are the Benefits of Pruning Crimson Bottlebrush?
Trimming crimson bottlebrush promotes abundant flowering and helps deter pests and diseases, leading to a stronger, more attractive plant.
What Is the Best Time for Pruning Crimson Bottlebrush?
What Is the Best Time for Pruning Crimson Bottlebrush?
These periods are considered ideal for trimming crimson bottlebrush as they follow the blooming phase. Pruning in late spring and early summer stimulates new development and prepares crimson bottlebrush for its next flowering cycle without negatively impacting current season's blooms. Furthermore, pruning after the final frost in these seasons reduces the risk of cold damage to new growth. This timing also aligns with crimson bottlebrush's inherent growth pattern, when the plant is actively growing and can recover quickly from cuts, lessening plant stress and disease risk.
What Tools Do I Need to Prune Crimson Bottlebrush?
Hand Pruners
Perfect for making precise cuts on small to medium-sized branches of crimson bottlebrush, minimizing harm to plant tissues.
Loppers
Useful for tackling slightly thicker branches of crimson bottlebrush that hand pruners can't manage, offering good leverage and cutting power.
Pruning Saw
Essential for cutting through the thickest branches of crimson bottlebrush that are too large for hand pruners and loppers.
Hedge Shears
Suitable for shaping and trimming the foliage of crimson bottlebrush, especially when creating hedges or formal designs, allowing for even and accurate cuts.
Gloves
Protective gloves should be worn to prevent injury from the stiff, needle-like leaves of crimson bottlebrush.
Pruning Sealer
Though not a tool, a sealer can be applied to large cuts on crimson bottlebrush to guard against disease and pests.
Step-by-step Instructions
Before pruning, sanitize tools to prevent disease spread. Begin by removing any dead or diseased branches with hand pruners. Continue by shaping or thinning overgrown areas with loppers or a pruning saw for larger cuts. Finish with hedge shears for formal shaping, if required. Clean and store tools after the pruning session.
How to Prune Crimson Bottlebrush
Step1: Tool Sanitization
Sanitize your pruning implements before beginning to ensure you don't transmit any illnesses to crimson bottlebrush. Use rubbing alcohol or a solution of one part bleach to nine parts water to clean the blades of your secateurs or pruning shears.
Step2: Dead Frond Removal
Begin by taking off any dead fronds from crimson bottlebrush. Gently tug the fronds to see if they detach easily. If so, they can be removed by hand. Otherwise, use your pruning shears to cut them where they meet healthy tissue. Ensure the cut is clean and angled away from the plant to prevent water accumulation and rot.
Step3: Disease Control Pruning
Identify diseased stems on crimson bottlebrush. Look for signs of discoloration, spots, or decay. Cut the diseased stems back to healthy tissue, making sure to cut at least a few inches below the affected parts to prevent further spread. Disinfect your pruning shears after each cut when dealing with diseased material.
Step4: Deadheading for Reblooming
Prune spent blossoms that have finished flowering on crimson bottlebrush to encourage new growth and more blooms. Make cuts just above the first set of leaves below the faded flower. This will prompt crimson bottlebrush to produce new shoots and flowers.
Step5: Shaping and Controlled Trimming
Shape crimson bottlebrush by trimming back any overgrown or unruly branches to maintain a neat appearance. Aim to preserve the natural form of crimson bottlebrush, making cuts at a 45-degree angle just above outward-facing buds or leaf nodes. This promotes outward growth and a bushier look.
Step6: Thinning for Airflow and Light
Thin out the interior of crimson bottlebrush if it is particularly dense, which will improve air circulation and light penetration to the plant's center. This helps prevent disease and fosters a healthier plant. Remove some of the inner branches entirely, cutting them back to their point of origin.
Step7: Post-Pruning Cleanup
Perform a cleanup after pruning crimson bottlebrush. Gather all the cuttings, dead fronds, and any diseased stems you've removed and dispose of them properly to reduce the risk of disease spreading in your garden.
Step8: Growth Monitoring
Monitor crimson bottlebrush after pruning for signs of new growth. Depending on the season and local climate, pruning can stimulate fresh shoots and flowers. Water the plant appropriately and consider applying a slow-release fertilizer to support recovery and growth.
Step9: Annual Pruning Schedule
Plan to prune crimson bottlebrush annually, after the main flowering season—this will usually be late spring through summer. Regular pruning not only helps maintain the shape and health of crimson bottlebrush but also encourages prolific blooming in the following season.
Post-Pruning Care for Crimson Bottlebrush
Post-Pruning Care for Crimson Bottlebrush
Immediately after trimming crimson bottlebrush, water thoroughly to aid recovery. Ensure the plant receives ample sunlight and is shielded from extreme temperatures. Maintain suitable humidity to promote healthy foliage. Apply a balanced, slow-release fertilizer to support regrowth. Regularly check for wilting, discoloration, or pests, which indicate stress or infection. If symptoms appear, isolate crimson bottlebrush and consult a professional for targeted care.
Common Pruning Mistakes with Crimson Bottlebrush
Over-pruning: Stress and Reduced Blooms
Excessive pruning, which can stress crimson bottlebrush and lead to a weak structure and fewer flowers.
Incorrect Cutting: Old Wood and Bare Branches
Cutting into mature wood where crimson bottlebrush is less likely to produce new shoots, potentially resulting in bare, unproductive branches.
Tool Sterilization: Disease Prevention
Failing to sterilize cutting tools before pruning, which can introduce diseases to crimson bottlebrush.
Forcing Shape: Disregarding Natural Growth
Ignoring the naturally weeping form of crimson bottlebrush by attempting to force an unnatural shape through pruning.
Random Pruning: Ignoring Plant's Characteristics
Pruning haphazardly without considering the growth pattern or flowering habits of crimson bottlebrush.
Common Pruning Tips for Crimson Bottlebrush
Selective Pruning: Encouraging New Growth
Perform targeted pruning to maintain the natural shape of crimson bottlebrush, cutting back to just above leaf nodes where new growth can readily emerge.
Deadheading: More Blooms, Less Seed Investment
Remove only the faded flowers and seed heads to encourage more blooms and prevent crimson bottlebrush from expending energy on seed production.
Thinning Branches: Enhancing Air and Sunlight
Thin out crowded branches to improve air circulation and sunlight penetration, which helps maintain the health of crimson bottlebrush.
Sharp Shears: Clean Cuts for Healthy Tissues
Use clean, sharp pruning shears to make precise cuts without damaging the plant tissues of crimson bottlebrush.
Post-flowering Shaping: Keeping Adequate Foliage
After flowering, lightly shape crimson bottlebrush if necessary, but always leave sufficient foliage to support photosynthesis and growth.


