How to Prune Fairy Duster?
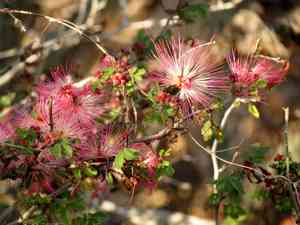
A deciduous bush recognized for its delicate, spherical blossoms, fairy Duster flourishes with judicious trimming. Eliminate lifeless or compromised limbs and reduce congested sections to enhance air circulation and light exposure. Perform pruning after the flowering period in late spring or early summer to sculpt the shrub and stimulate compact development. Trimming at this juncture guarantees the finest floral exhibition and sustains the plant's vigor, rendering fairy Duster highly suitable for garden beauty and indigenous environments.
Advantages of Trimming Fairy Duster
Advantages of Trimming Fairy Duster
Trimming fairy Duster promotes more abundant flowering and aids in preventing pests and diseases by eliminating dead or infected wood, thereby preserving a robust and attractive shape.
Optimal Time for Trimming Fairy Duster
Optimal Time for Trimming Fairy Duster
Trimming fairy Duster in late spring and early summer is ideal as this period coincides with the plant's flowering cycle completion. Since fairy Duster typically blooms in spring, waiting until after the flowers have faded ensures that pruning won't remove developing flower buds, which would diminish the plant's floral display. This timeframe also precedes fairy Duster's active growth phase, usually in summer. Pruning in late spring or early summer stimulates new growth, helps maintain the desired form, and encourages a strong, healthy plant structure. Furthermore, removing spent flowers and any dead or damaged branches at this time improves air circulation within the plant, which can help prevent disease. Additionally, pruning during active growth allows fairy Duster to recover more quickly from cuts, reducing stress and susceptibility to pests or pathogens.
Required Tools for Trimming Fairy Duster
Hand Pruners
Perfect for snipping small branches and twigs on fairy Duster. They enable accurate cuts, preventing harm to delicate branches.
Pruning Shears
Effective for shaping fairy Duster throughout the growing season, as they can easily cut through stems and branches up to ¾ inch thick.
Loppers
Suitable for reaching deeper into the fairy Duster or cutting thicker branches that hand pruners cannot manage. They offer good leverage and increased cutting power.
Pruning Saw
Essential for branches thicker than what loppers can handle. A fine-toothed pruning saw is appropriate for fairy Duster to make clean cuts without tearing the bark.
Gloves
Protect hands from thorns and rough branches while trimming fairy Duster.
Disinfectant
To sanitize tools between cuts to prevent the spread of pests or diseases when trimming fairy Duster.
How to Trim Fairy Duster
Clean And Sharpen Tools
Before beginning, ensure pruning tools are clean and sharp to prevent disease spread and promote healthy cuts on fairy Duster.
Remove Damaged Material
Carefully remove any diseased or withered leaves, as well as dead or diseased branches from fairy Duster to maintain plant health and appearance.
Cut Back Withered Flowers
Snip off withered flowers from fairy Duster to encourage further blooming and to direct the plant's energy toward growth and the production of new flowers.
Thin Out Dense Areas
Thin out areas of excessive growth by selectively pruning branches from fairy Duster that are causing overcrowding. This improves air circulation and light penetration.
Shape The Plant
Lightly shape fairy Duster by trimming overextended branches to maintain a balanced, natural form while being careful not to overprune, which can cause stress to the plant.
Common Trimming Mistakes with Fairy Duster
Over-Pruning
Cutting back too much of fairy Duster can stress the plant, reduce flowering, and potentially lead to dieback.
Improper Cut Locations
Making cuts too far from a bud, or leaving large stubs, can result in weak growth and make the plant susceptible to diseases.
Using Dull Tools
Pruning with dull tools causes ragged cuts that can harm fairy Duster, leading to disease and poor healing.
Pruning During Growth
Trimming fairy Duster when new shoots are growing can remove the developing buds, thus decreasing the potential for blooms.
Ignoring Diseased Material
Failing to remove diseased or dead wood can allow infections to persist and spread throughout fairy Duster.
Common Trimming Tips for Fairy Duster
Clean Cuts
Use sharp, clean pruning shears to make precise cuts, which will heal more quickly and reduce the risk of disease.
Cut Angle
Cut at a 45-degree angle, about 1/4 inch above a leaf node or bud, to promote healthy regrowth in fairy Duster.
Shape Maintenance
Prune to maintain fairy Duster's natural shape, removing only what's necessary to enhance its form or to remove damaged growth.
Crossing Branches
Remove any branches that are crossing or rubbing against each other to prevent wounds and potential entry points for disease.
Post-Bloom Trim
Deadhead spent flowers on fairy Duster to encourage further blooming and to maintain a tidy appearance.


