How to Prune Japanese laurel?
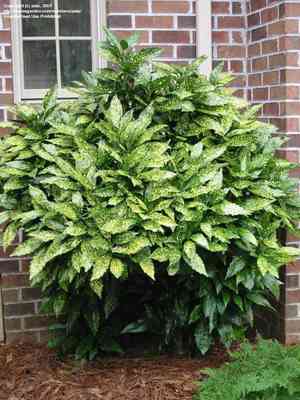
Featuring lustrous evergreen foliage and crimson berries, Aucuba japonica is a resilient shrub. Trimming should concentrate on excising deceased or compromised limbs, sculpting for dimension management, and fostering dense development. The ideal period for pruning is during the winter season, when the plant is inactive. It is crucial to execute precise cuts to avert illness. Pruning can additionally stimulate berry yield, augmenting the plant's decorative charm. Always sanitize implements prior to utilization to mitigate the danger of contamination.
Advantages of Trimming Japanese Laurel
Advantages of Trimming Japanese Laurel
Trimming japanese laurel promotes strong development and helps maintain its desired form. By eliminating old or crowded branches, air circulation improves, lowering disease risk and stimulating vigorous new foliage.
Optimal Period for Trimming Japanese Laurel
Optimal Period for Trimming Japanese Laurel
Trimming japanese laurel in winter aligns with its dormant phase, minimizing plant stress and reducing the chance of sap loss or disease entry. This timing also allows gardeners to better shape the plant as leaves are sparse, and it encourages robust growth in the subsequent spring. Furthermore, pruning before new growth begins ensures energy is directed towards developing the desired plant structure rather than to parts that will be removed.
Tools Required for Trimming Japanese Laurel
Hand Pruners
Essential for making precise cuts on the smaller branches and leaves of japanese laurel. They offer the necessary control to shape the plant without causing needless harm.
Lopping Shears
Useful for cutting through thicker branches of japanese laurel that are up to about 1.5 inches in diameter, which hand pruners may not be able to manage.
Pruning Saw
Ideal for cutting larger branches over 1.5 inches thick that lopping shears cannot handle. It allows for clean cuts without tearing the bark.
Hedge Shears
Perfect for shaping and trimming the dense foliage of japanese laurel, especially when creating a hedge or a specific form.
Gloves
Important for protecting hands from scratches and enhancing grip while pruning japanese laurel.
Garden Snips
Recommended for deadheading flowers and precise snipping of delicate stems or leaves on japanese laurel.
Wound Sealant
Used after cutting larger branches to protect japanese laurel from diseases and pests while the cuts heal.
How to Trim Japanese Laurel
Step1: Tool Sterilization
Sanitize your pruning tools. Before you begin, ensure your pruning shears, loppers, or saws are clean and sharp to prevent spreading disease to japanese laurel. Sterilize tools with a solution of one part bleach to nine parts water or use rubbing alcohol.
Step2: Identifying Dead Wood
Identify dead wood on japanese laurel. This can be spotted as branches or stems that are no longer producing leaves, are brittle, and have a gray or brown color, in contrast to the healthy green or reddish stems.
Step3: Cutting Dead Wood
Trim dead wood by making clean cuts. Cut these branches back to living tissue, easily recognized by its greenish color if you scratch the bark slightly. Make the cut at a slight angle, about a quarter inch above a bud or branching point that faces the outside of the plant. This encourages outward growth.
Step4: Spotting Diseased Limbs
Locate diseased limbs on japanese laurel. Signs of disease include abnormal growth, discoloration, or a sticky substance on the leaves and branches. Remove these limbs completely to prevent the spread of disease.
Step5: Removing Diseased Limbs
Trim diseased limbs cleanly, cutting well back into healthy tissue. For larger limbs, use the three-cut method: first, a notch is made on the underside of the limb a few inches away from the trunk; second, the limb is cut off from the top, a few inches further out from the notch; finally, the stub is removed by cutting just outside the branch collar.
Step6: Finding Damaged Branches
Examine japanese laurel for damaged branches, which may be caused by weather, animals, or mechanical injury. These branches might be split, broken, or hanging loosely.
Step7: Removing Damaged Branches
Carefully remove damaged branches by cutting them back to a main stem or to a healthy part of the branch. Use similar cutting methods as for dead wood removal, ensuring cuts are clean and made at an angle to facilitate water runoff and healing.
Step8: Shaping the Plant
After removal of dead, diseased, and damaged wood, step back to review the shape of japanese laurel. If it is necessary to shape the plant for aesthetic reasons or to encourage a bushier habit, selectively prune back to just above outward-facing buds or nodes.
Step9: Clearing Debris
Clean up all the pruned material from around japanese laurel to prevent any potential spread of disease and to maintain a tidy growing environment.
Step10: Post-Pruning Care
Water japanese laurel if the soil is dry and apply a balanced, slow-release fertilizer to support recovery and new growth after pruning.
After-Trimming Care for Japanese Laurel
After-Trimming Care for Japanese Laurel
Immediately following trimming, japanese laurel requires gentle watering to reduce stress. Position japanese laurel in dappled shade, maintaining humidity without waterlogging. Protect japanese laurel from temperature extremes, ideally between 60-75°F. A slow-release balanced fertilizer aids in recovery, but avoid over-fertilization. Monitor japanese laurel for wilt, discolored leaves, or signs of infection. If such symptoms arise, inspect for pests, adjust care, and consider eco-friendly fungicides or insecticides. Ensuring these conditions can support japanese laurel's regeneration and robust growth.
Common Trimming Errors with Japanese Laurel
Using Dull and Dirty Pruning Tools
Neglecting to use clean, sharp tools can lead to jagged cuts that harm japanese laurel, making it vulnerable to pests and diseases.
Over-Pruning in One Session
Removing too much foliage at once can stress japanese laurel, stunting its growth and potentially leading to the plant's decline.
Pruning Without a Plan
Pruning without a clear objective may result in an undesirable shape or size, adversely affecting japanese laurel's aesthetic appeal.
Making Torn, Ragged Cuts
Tearing or ripping branches instead of making clean cuts could create wounds that are slow to heal, increasing susceptibility to disease.
Neglecting to Remove Unhealthy Stems
Ignoring dead, diseased, or damaged stems during pruning fails to encourage japanese laurel's vigorous growth and can allow problems to spread.
General Trimming Advice for Japanese Laurel
Clean, Sharp Cuts for Healthy Healing
Use disinfected, sharp pruning shears to make clean cuts that japanese laurel can quickly heal from.
Preserve Natural Shape and Improve Circulation
Prune strategically to maintain the natural shape of japanese laurel, selectively thinning out crowded areas to improve air circulation and light penetration.
Limit Foliage Removal to Reduce Stress
Remove only about 10-30% of the total foliage in a single pruning session to avoid placing japanese laurel under undue stress.
Prune Above Nodes for Directing Growth
Cut back to just above a leaf node or bud to encourage japanese laurel to grow in a desired direction and to maintain its density.
Remove Problem Stems for Vigorous Growth
Regularly inspect japanese laurel for dead, damaged, or diseased stems, which should be removed promptly to maintain plant health.


