How to Prune Tall Thimbleweed?
Originating from North America, this enduring plant is recognized for its unique thimble-like seed structures. To manage tall Thimbleweed, remove faded flowers to stimulate additional blossoming and sustain the plant's vitality. After the blooming cycle concludes, trim back the leaves to foster robust new development. The optimal time for this trimming spans from the beginning of spring through the end of summer. Such maintenance will revitalize tall Thimbleweed and can assist in controlling its dispersal, given its abundant self-seeding tendency.
What Are the Benefits of Pruning Tall Thimbleweed?
What Are the Benefits of Pruning Tall Thimbleweed?
Trimming tall Thimbleweed encourages more robust growth, leading to strong, healthy shoots. Regular cutting helps maintain an appealing shape, preventing excessive growth.
What Is the Best Time for Pruning Tall Thimbleweed?
What Is the Best Time for Pruning Tall Thimbleweed?
In early spring, tall Thimbleweed is still inactive, making it an ideal period to prune or trim the plant without causing stress or disrupting active growth phases. Removing dead or damaged parts before new growth starts can result in a more vigorous and healthy plant. Late summer pruning, after tall Thimbleweed has flowered and produced seeds, can assist in shaping the plant and managing its size without impacting the following season's blooms. This is also a time when the plant begins to prepare for dormancy, making it less vulnerable to pruning damage.
What Tools Do I Need to Prune Tall Thimbleweed?
Bypass Pruners
Perfect for making clean cuts on the relatively slender stems of tall Thimbleweed, causing minimal harm to plant tissues and encouraging healthy regrowth.
Gardening Gloves
Essential for protecting hands from thorns and potential skin irritation when handling tall Thimbleweed.
Pruning Shears
Suitable for snipping off dead or overgrown sections of tall Thimbleweed, ensuring precision and control during the pruning process.
How to Prune Tall Thimbleweed
Step1: Timing for Pruning
Wait for the appropriate season to begin pruning tall Thimbleweed, which is typically late winter or early spring before new growth emerges.
Step2: Sterilize Pruning Tools
Sanitize pruning shears or scissors with rubbing alcohol or a 10% bleach solution to prevent the spread of disease.
Step3: Identify Dead Stalks
Locate dead stalks by looking for stems that are brown, brittle, and show no signs of green growth.
Step4: Prune Dead Stalks
Cut dead stalks near ground level, ensuring clean cuts without tearing, which can injure tall Thimbleweed and make it susceptible to disease.
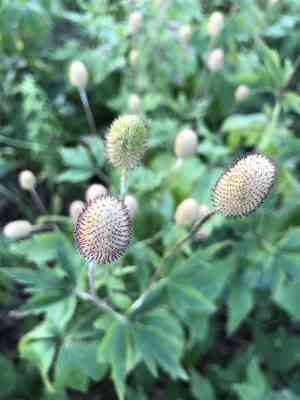
Step5: Find Old Flowers
Identify old flowers, which are typically dry and brown, and may have seed heads.
Step6: Prune Spent Blooms
Remove old flowers by cutting the stem just above the first set of healthy leaves below the spent bloom. This redirects tall Thimbleweed's energy to new growth and potential new blooms.
Step7: Dispose of Pruning Debris
After pruning, gather and discard all removed material to prevent the spread of diseases or pests.
Step8: Water After Pruning
Water the base of tall Thimbleweed after pruning, as this will aid its recovery and stimulate new growth.
Step9: Monitor for Regrowth and Disease
Observe tall Thimbleweed for new growth and additional dead or diseased stems throughout the growing season, and prune as necessary following the steps above.
Step10: Use Sharp Clean Cutters
Maintain sharp, clean cutters and handle tall Thimbleweed gently to minimize stress and damage to the plant.
Post-Pruning Care for Tall Thimbleweed
Post-Pruning Care for Tall Thimbleweed
After pruning tall Thimbleweed, immediately water the soil to alleviate stress. Maintain a humid environment without saturating leaves to prevent disease. Ensure indirect light exposure to support recovery, avoiding direct sun. Adjust temperature to a moderate range, mimicking tall Thimbleweed's native climate. Apply a balanced, slow-release fertilizer to replenish nutrients. Observe for wilting or discolored foliage as signs of stress. If infection signs like unusual spots or decay appear, treat promptly with appropriate fungicide or pest control measures. Consistent monitoring and gentle care are crucial for tall Thimbleweed's post-pruning health.
Common Pruning Mistakes with Tall Thimbleweed
Avoid Pruning Too Close to Plant Crown or Base
Cutting tall Thimbleweed too close to the crown or base can harm the plant's delicate shoots and cause rot or disease in the crown area.
Do Not Remove Excessive Foliage at Once
Removing too much foliage from tall Thimbleweed at once can stress the plant, hindering its growth and blooming potential.
Use Clean, Sharp Tools to Prevent Damage and Disease
Using dull or dirty pruning tools can damage tall Thimbleweed's stems and introduce diseases to the plant.
Maintain Plant's Natural Shape During Pruning
Not considering the plant's natural form when pruning can result in an unnatural appearance and weakens the structure of tall Thimbleweed.
Remove Dead Flowers to Prevent Energy Drain and Self-Seeding
Failing to remove spent flowers or seed heads may lead to unwanted self-seeding and can drain the energy of tall Thimbleweed.
Common Pruning Tips for Tall Thimbleweed
Use Clean, Sharp Shears for Precise Cuts
Always use clean, sharp pruning shears to make precise cuts on tall Thimbleweed, reducing stress on the plant and promoting faster healing.
Redirect Energy by Pruning Back to Basal Foliage
Cut back spent flower stalks to the basal foliage to redirect tall Thimbleweed's energy towards root and foliar development, ensuring future blooms.
Thin Out Stems for Better Air Circulation and Light
Thin out crowded stems to improve air circulation and light penetration, which helps reduce the risk of disease in tall Thimbleweed.
Follow Natural Plant Form for Strong Structure
When shaping tall Thimbleweed, follow its natural form and prune selectively, focusing on removing only dead, diseased, or weak stems to maintain a strong structure.
Manage Self-Seeding with Selective Seed Head Removal
After flowering, consider leaving some seed heads to provide winter interest and habitats for beneficial insects, but remember to manage self-seeding according to your garden design.


