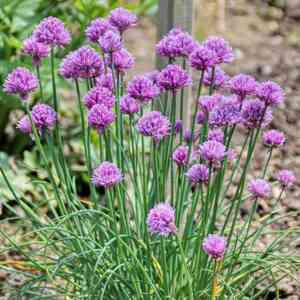
How to Prune Chives?
This enduring herb, known for its palatable, hollow, grass-like foliage, flourishes with proper trimming. Harvest 'chives' by cutting the leaves near the soil line for cooking purposes, which stimulates fresh development. Perform a substantial pruning in early spring to foster vigor. Removing spent blooms is not required since 'chives' seldom produce flowers. Consistent harvesting serves as the primary pruning method, effective from early spring through late summer. This guarantees a steady provision of new leaves and preserves the plant's dense form. Trimming benefits 'chives' by boosting its health and inhibiting excessive expansion.
What Are the Benefits of Pruning Chives?
What Are the Benefits of Pruning Chives?
Trimming chives promotes robust development and helps maintain its form. Consistent cutting leads to denser foliage, resulting in a more attractive and abundant look. It's especially vital after blooming to encourage the emergence of new edible shoots.
What Is the Best Time for Pruning Chives?
What Is the Best Time for Pruning Chives?
In early spring, chives is just starting its active growth phase, making it the perfect time to remove any dead foliage from the previous season and shape the plant for the upcoming growing period. This encourages more vigorous growth and helps maintain plant health. Late summer is another suitable period because chives has usually finished flowering, and pruning at this time can encourage a new flush of leaves before the plant becomes dormant in winter. Pruning during these seasons avoids disrupting the flowering cycle and limits stress on chives, ensuring a strong comeback in the following growing season.
What Tools Do I Need to Prune Chives?
Sharp Scissors or Shears
Given the slender and hollow nature of chives stems, sharp scissors or shears provide accurate cuts without crushing the delicate tissue, fostering rapid recovery and regrowth.
Hand Pruners
Chives may occasionally need thinning to ensure air circulation and reduce overcrowding. Hand pruners are suitable for removing denser foliage or older, tougher stems that scissors might not handle as effectively.
Clean Cloth and Disinfectant
To prevent the spread of disease when pruning chives, tools should be wiped with a clean cloth and disinfected with alcohol or an appropriate disinfectant before and after use.
Gardening Gloves
While not essential for the well-being of chives, gloves protect the gardener's hands and ensure a comfortable grip when pruning for extended periods.
How to Prune Chives
Step1: Sanitize Pruning Tools
Before pruning chives, ensure you have clean, sharp scissors or shears. Disinfect your gardening tools with rubbing alcohol to prevent the spread of disease.
Step2: Identify Old Growth
Examine chives for old shoots that are thicker and tougher than the rest. Identify these older stems to be targeted for your first pruning efforts.
Step3: Prune Old Shoots at Base
Cut the old shoots at the base, close to the soil level. Make the cuts cleanly without tearing to promote quick recovery and new growth.
Step4: Inspect for Disease
Examine chives for any diseased parts. Signs of disease may include unusual spots, coloration, or decay. Isolate the affected area to be trimmed.
Step5: Remove Diseased Parts
Carefully remove the diseased parts by cutting them away from the healthy tissue. Ensure you cut into healthy tissue to prevent any disease from remaining.
Step6: Identify Yellow Leaves
Locate yellow leaves, which are usually older or damaged and no longer productive. Identify these leaves for removal to redirect chives's energy to healthier growth.
Step7: Prune Yellow Leaves
Prune the yellow leaves by cutting them at the base where they meet the soil, or just above the base of the plant if removing individual leaves.
Step8: Dispose of Plant Debris
After pruning, gather all removed plant material and dispose of it away from the gardening area to avoid the potential spread of disease or pests.
Step9: Water Plant Post-Pruning
Water chives after pruning to encourage new growth, being careful not to overwater as chives prefers well-drained soil.
Step10: Monitor for New Growth
Monitor chives post-pruning for signs of new growth, which typically involves fresh green shoots emerging from the base. This indicates a successful pruning.
Post-Pruning Care for Chives
Post-Pruning Care for Chives
Immediately after pruning chives, water thoroughly to reduce transplant shock. Ensure chives receives adequate light but avoid direct midday sun to prevent stress. Maintain a consistent temperature (60-70°F) and moderate humidity. Apply a balanced, slow-release fertilizer to support recovery and growth. Regularly inspect chives for signs of stress, such as yellowing leaves, and any indications of infection like spots or wilt. If symptoms appear, adjust care practices accordingly and consider a gentle fungicide if infection is suspected.
Common Pruning Mistakes with Chives
Overly Aggressive Cutting Back
A frequent error is cutting back chives too severely, which can weaken the plant and impede regrowth. Leaving at least 2 inches of the plant above the soil is crucial.
Top-Only Pruning
Another mistake is pruning only the tops of chives, leading to uneven growth and potentially hindering the development of new, flavorful leaves.
Neglecting Regular Harvesting or Pruning
Some gardeners fail to regularly harvest or prune chives, causing the plant to become woody and less productive. Regular trimming encourages fuller, healthier plants.
Common Pruning Tips for Chives
Use Sharp, Clean Cutting Tools
Use sharp, clean scissors or shears to make precise cuts on chives, which helps prevent damage and potential disease entry points.
Prune Outer Leaves to Stimulate Growth
For chives, it's essential to consistently prune or harvest the outer leaves, which stimulates the growth of fresh, tender shoots from the base.
Deadhead After Flowering for Foliage Growth
After chives flowers, deadhead the spent blossoms promptly to refocus the plant's energy on producing lush foliage instead of setting seeds.


