How to Propagate Siberian squill?
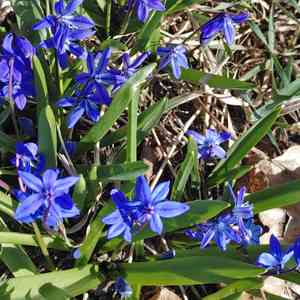
Siberian squill is most effectively multiplied in the springtime by utilizing its underground tubers. This technique demands a moderate level of expertise, with the emergence of fresh sprouts indicating successful propagation. Guaranteeing adequately draining soil and appropriate distances between plants is crucial for their best development.
Optimal Time for Siberian Squill Propagation
Propagation Method
Utilize The Tubers
Propagation Period
Spring
Tools for Siberian Squill Propagation
Garden Trowel
A garden trowel serves as a crucial hand tool for excavating small holes or furrows to plant siberian squill tubers. Its pointed, scoop-shaped blade is ideal for working in confined areas and guarantees precision when positioning tubers at the correct depth, fostering optimal root development.
Planting Auger
An auger attachment for a drill can speed up the planting of siberian squill tubers, especially when dealing with large quantities. It quickly drills uniform holes, saving time and reducing physical effort. This tool is particularly useful for achieving the recommended spacing and depth for the tubers, which is vital for proper growth.
Tubers/Bulbs Planter
A specialized bulbs planter aids in precisely placing tubers at the correct depth and can also help remove soil cores, ensuring siberian squill is planted properly without harming the tubers. This contributes to a higher propagation success rate.
Watering Can with a Fine Rose
A watering can equipped with a fine rose attachment is perfect for gently irrigating the soil around newly planted siberian squill tubers, providing even moisture without disturbing the soil or the tubers. Proper watering is essential for initiating root and shoot growth.
Label or Marker
Plant labels or markers are indispensable for tracking the species and location of planted siberian squill tubers, particularly when cultivating multiple different species in the same area. This ensures each plant receives appropriate care throughout its growth cycle.
Ruler or Measuring Stick
A ruler or measuring stick is important for maintaining the correct distance between planted siberian squill tubers and for ensuring they are planted at the right depth. Consistent depth and spacing are key factors for successful propagation and uniform growth.
Gloves
Gardening gloves protect hands during propagation and offer a better grip on tools, potentially increasing the precision of tuber placement. This protection is important when working with soil and garden tools to prevent injury and skin irritation.
How to Propagate Siberian Squill
Propagation Method
Utilize The Tubers
Difficulty Level
Easy
Caring for Newly Propagated Siberian Squill
Caring for Newly Propagated Siberian Squill
After propagation, siberian squill requires minimal attention. They thrive in sunny to partly shaded spots and should be watered during dry spells. Fertilization is generally not needed. Once siberian squill blooms in spring, allow the foliage to naturally wither, as it supplies essential nutrients to the bulbs for the following year's growth. Divide the bulbs every 3-5 years to prevent overcrowding and encourage vigorous development.
Common Errors to Avoid When Propagating Siberian Squill
Overwatering
Excessive watering can lead to bulb rot for siberian squill, effectively killing the plant. The bulbs are susceptible to decay if the soil is too wet, impeding root development and plant vitality.
Planting depth
Planting siberian squill bulbs too deep can hinder their proper emergence. This can also make them more vulnerable to freezing and rotting, especially in soils that retain too much moisture.
Overcrowding
Overcrowding siberian squill bulbs can result in poor air circulation and diminish overall bloom quality. It might also encourage disease spread, limiting growth and flower production.
Ignoring soil composition
Failing to prepare the soil with the correct composition for siberian squill can severely impact the plant's health. Poor drainage and incorrect pH levels can affect root growth and nutrient absorption.
Neglecting separation
Not separating offsets from the parent siberian squill bulb can impede the growth of new plants. Separation is crucial for ensuring the vitality and propagation success of the new bulbs.
Tips for Propagating Siberian Squill
Bulb quality
Choose healthy bulbs for siberian squill propagation to ensure the best chance of growth. Look for firm bulbs free of blemishes or signs of disease.
Soil preparation
Prepare well-draining soil with added organic matter to create an optimal environment for siberian squill growth. A mix of loam, sand, and compost can promote healthy root development.
Appropriate spacing
Space siberian squill bulbs correctly to ensure ample room for growth and adequate air circulation. This minimizes competition for resources and lowers disease risk.
Adequate light
Ensure siberian squill is planted in a location where it receives sufficient sunlight. Proper lighting conditions support photosynthesis, leading to healthier plants and more vibrant blooms.
Moderate watering
Water siberian squill bulbs moderately after planting, just enough to keep the soil moist but not waterlogged. This approach maintains ideal moisture levels for bulb growth without causing rot.


