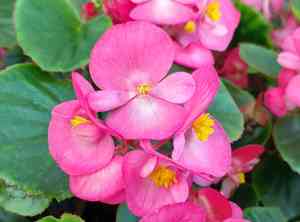
How to Propagate Hardy begonia?
The primary method for propagating Begonia grandis is via tubers in the springtime. This process presents a moderate challenge, with successful multiplication evidenced by the appearance of fresh sprouts. Verify that the tubers are sound, devoid of decay, and situated in a growing medium that drains effectively.
Optimal Period for Propagating Hardy Begonia
Propagation Method
Utilize The Tubers
Propagation Period
Spring
Tools Required for Hardy Begonia Propagation
Sterile potting mix
Essential for tuber propagation, a sterile potting mix prevents soil-borne illnesses and offers a well-draining environment, crucial for hardy begonia. The blend should be light and airy to aid healthy root development without rot risk.
Pots or containers with drainage holes
Containers with proper drainage are vital for rooting tubers. They allow excess water to escape, reducing the risk of fungal diseases that can negatively impact hardy begonia.
Plant labels and a waterproof marker
These are used to mark pots with the plant's identification and planting date. Labeling helps track growth progress and ensures proper care for hardy begonia throughout propagation stages.
Propagating tray
Equipped with a humidity dome, a propagating tray provides a controlled environment to maintain adequate humidity and warmth, fostering an ideal atmosphere for hardy begonia tubers to sprout.
Misting bottle
Regular misting ensures the tubers do not dry out. Proper hydration via misting supports the initial growth phase of hardy begonia, preventing dehydration before roots fully develop.
Tweezers or small tongs
Used for handling small or delicate tubers without causing damage, ensuring hardy begonia is gently placed into the potting mix and avoiding harm that could compromise propagation success.
Scalpel or sharp knife
A sterilized scalpel or sharp knife is needed to divide tubers if necessary. Clean cuts help prevent infections and promote faster healing, allowing hardy begonia to establish more effectively.
Rooting hormone
Sometimes applied to the cut surface of tubers to encourage root formation, rooting hormone can improve the chances of successful hardy begonia propagation by stimulating root growth at cut sites.
Steps to Propagate Hardy Begonia
Propagation Method
Utilize The Tubers
Difficulty Level
Easy
Post-Propagation Care for Your Hardy Begonia
Post-Propagation Care for Your Hardy Begonia
After propagation, keep hardy begonia's soil consistently moist, but avoid overwatering. Provide partial shade to shield leaves from excessive direct sunlight. Fertilize with a balanced, water-soluble feed every two weeks during the growing season. Protect hardy begonia from extreme weather, especially frost or prolonged dry spells. As hardy begonia grows, support may be needed if stems become long and heavy. Monitor for pests like aphids or slugs and treat as necessary.
Common Errors to Avoid When Propagating Hardy Begonia
Overwatering
While propagating hardy begonia requires moist soil, excessive watering can lead to root rot and fungal growth, impeding the plant's development.
Deep planting
Planting hardy begonia's tubers or cuttings too deeply can prevent sprouting due to insufficient light and potential rot.
Neglecting humidity
Ignoring the importance of humidity can cause hardy begonia cuttings to dry out before root development.
Ignoring soil mix
Using an unsuitable soil mix can hinder proper root growth due to poor aeration or drainage, vital for hardy begonia propagation.
Overcrowding
Placing hardy begonia cuttings or seedlings too close together can inhibit growth due to competition for light, nutrients, and air circulation.
Cutting carelessness
Making improper cuts or using dull tools can damage hardy begonia cuttings, introducing diseases and hindering rooting.
Advice for Propagating Hardy Begonia
Moisture balance
Maintain consistent soil moisture when propagating hardy begonia, ensuring it's damp but not waterlogged to encourage rooting.
Shallow planting
Plant hardy begonia tubers or cuttings just beneath the soil surface for adequate light exposure and to prevent rotting.
Humidity control
Use a plastic cover or propagator to retain moisture and humidity around hardy begonia cuttings, supporting the rooting process.
Appropriate soil mix
Choose a well-draining, airy soil mix for hardy begonia propagation to promote robust root development and prevent waterlogging.
Spacing
Adequately space hardy begonia cuttings or seedlings to ensure sufficient light and air circulation, fostering healthier growth.
Sharp tools
Employ sharp, clean cutting tools for taking hardy begonia cuttings, minimizing damage and potential disease entry points for healthier rooting.


