How to Overwinter Northern sea oats
1
Northern sea oats are resilient and tolerate freezing temperatures effectively.
2
After establishment, Northern sea oats need very little water in the colder season.
3
Trimming the stems to roughly 10 cm (4 inches) aids in proper winter preparation.
Understanding the Frost Hardiness of Northern sea oats
Understanding the Frost Hardiness of Northern sea oats
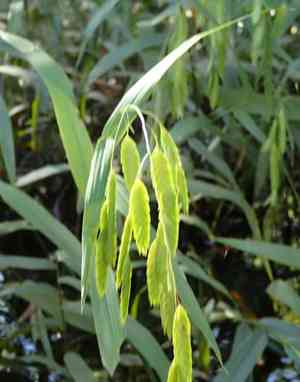
While Northern sea oats (Chasmanthium latifolium) are recognized for their distinctive decorative seed heads and vibrant green leaves during the active growth period, their resilience truly shines in winter. These grasses possess considerable frost tolerance, meaning they can withstand cold temperatures and frost without significant harm. This robustness makes them an excellent option for gardens in diverse climates. However, comprehending their cold tolerance is vital for ensuring their continued prosperity year after year.
Preparing Northern sea oats for Winter
Assessing Plant Health
Prior to winter's arrival, evaluate the overall condition of your Northern sea oats. Look for indications of disease or pest infestations, and address these concerns promptly. Healthy plants are more likely to endure harsh winter conditions, so take the time to inspect foliage, stems, and the root crown for any irregularities. If you discover any issues, treat them accordingly to enhance the plant's resilience.
Pruning and Cutting Back
As the growing season concludes, it's beneficial to trim your Northern sea oats. Cut back the stems to approximately 10 cm (4 inches) above the ground. This not only aids in reducing the risk of disease but also directs the plant's energy towards root development, which is critical for winter survival. Using sharp garden shears, make clean cuts to avoid damaging the plant tissue.
Mulching for Protection
Applying a layer of mulch around the base of your Northern sea oats can provide additional defense against the cold. Mulch functions as an insulating layer, helping to stabilize soil temperature and retain moisture. Utilize organic materials such as straw, wood chips, or compost, and spread a layer about 5-8 cm (2-3 inches) thick. This layer will shield the roots from extreme temperature fluctuations and frost heave.
Watering Northern sea oats During Winter
Optimal Watering Schedule
In winter, Northern sea oats do not require frequent irrigation, as the plants enter a dormant state. Water only when the soil feels dry to the touch. In most instances, watering once a month is adequate during this season. Be sure not to water if the ground is frozen; doing so could cause more harm than good.
Avoiding Overwatering
It's crucial to prevent overwatering during winter months. Excessive water can lead to root rot, a common problem that can severely damage or kill your Northern sea oats. Ensure the soil has good drainage and avoid areas where water collects. If your region experiences heavy rainfall, additional watering might not be necessary at all.
Common Issues and Solutions in Overwintering Northern sea oats
Dealing with Frost Damage
Despite their hardiness, unexpected frost can sometimes harm parts of the Northern sea oats. If you observe frost damage, remove the affected areas to prevent decay and disease. Frost-damaged stalks can be pruned back to healthy tissue, which often helps the plant recover more effectively.
Preventing Root Rot
Root rot typically results from poor drainage or overwatering. Ensure your Northern sea oats are planted in well-draining soil. If you notice mushy or discolored roots, reduce watering and improve soil drainage. You might need to replant in a better-draining location if the problem persists.
When to Start Preparing Northern sea oats for Spring
Signs of New Growth
As winter recedes and temperatures begin to climb, you'll notice new green shoots emerging from the base of your Northern sea oats. This is a clear indication that the plant is exiting dormancy. At this point, you can begin preparing for the upcoming growing season.
Gradually Reducing Mulch
Removing mulch progressively as the weather warms can help prevent any potential fungal growth caused by excessive moisture retention. Slowly rake away the mulch in stages over several weeks, allowing the soil to warm up and encouraging the plant to re-establish itself.


