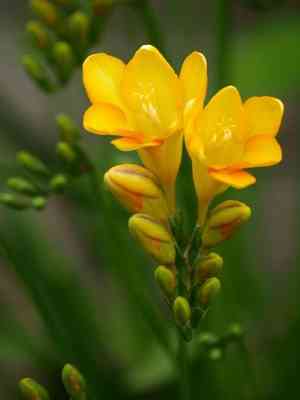
How to Transplant Common freesia?
The ideal period for relocating common freesia spans from mid-spring through late spring, since the atmospheric conditions foster robust development. Common freesia thrives in porous soil with ample, diffused illumination. To ensure a smooth transplant, guarantee adequate spacing and prevent excessive moisture.
Essential Preparations Before Relocating Common Freesia
Optimal Timing for Common Freesia Relocation?
The prime period for moving your beautiful common freesia falls between mid-spring and late spring. This vibrant growth phase allows common freesia to adapt and flourish in its new spot. Transplanting then helps common freesia initiate fresh growth, utilize spring's abundant rainfall, and establish roots before summer's heat. Your common freesia will reward this careful timing with magnificent blooms.
Required Spacing Between Common Freesia Plants?
When moving your common freesia, ensure a gap of approximately 4-6 inches (10-15 cm) between each plant. This provides ample space for their growth and development.
Best Soil Blend for Common Freesia Transplanting?
Common freesia thrives in soil that drains well and is rich in organic matter. Enhance soil quality by incorporating compost or aged manure. A slow-release granular fertilizer can also be added before transplanting for an initial nutrient boost.
Ideal New Location for Your Common Freesia?
Choose a spot for your common freesia that receives ample indirect sunlight, as it prefers partial to full shade. Avoid areas with direct sun, which can cause the delicate flowers to fade.
Equipment Needed Before Transplanting Common Freesia?
Gardening Gloves
To shield your hands from dirt or potential scrapes.
Garden Shovel or Trowel
This tool is used for digging soil and carefully lifting the plant without harming its roots.
Watering Can
Essential for hydrating the plant during and after the transplanting process.
Garden Spade
A spade will be utilized if the plant is large or if numerous soil clumps around the roots need breaking apart.
Mulch
To retain moisture for the plant post-transplant and to guard against sudden temperature shifts.
How to Extract Common Freesia from the Ground?
How to Extract Common Freesia from the Ground?
From Ground: First, lightly water the common freesia plant to soften the soil. Using your shovel or spade, carefully dig around the plant, ensuring you avoid damaging the root ball. Dig deeper beneath the root ball and gently lift the plant from its original spot.From Pot: If your common freesia plant is in a pot, water it slightly beforehand. Then, hold the plant at the base of the stem and try to carefully slide it out. If it doesn't come out easily, you might need to tap the pot against a firm surface to loosen it.From Seedling Tray: Water the seedlings, then gently remove them by pushing up the base with a blunt stick, holding the leaf (not the stem or roots) to carefully pull it out.
Step-by-Step Guide for Relocating Common Freesia
Preparation
Prepare the new planting site by digging a hole roughly twice the width and depth of the common freesia's root ball. Loosen the soil at the bottom of the hole with your spade or shovel.
Placement
Carefully lower the common freesia plant into the hole, positioning it so the top of its root ball is level with the soil surface.
Backfill
Gently refill the hole with soil, ensuring the common freesia plant remains upright. Lightly firm the soil around the plant, but avoid compacting it heavily; you want the roots to contact the soil without being crushed.
Watering
After the common freesia plant is in its new home, water it generously.
Post-Transplant Care for Common Freesia
Protection
Shield from direct sunlight for a few days after transplanting. This helps the common freesia plant adapt to its new environment without stress from intense light.
Watering
While common freesia enjoys moisture, overwatering can be detrimental. Water only when the topsoil feels dry to the touch.
Pruning
It's beneficial to remove any wilted or dead leaves after transplanting. This allows your common freesia plant to direct its energy towards new growth in the new location rather than repairing damaged foliage.
Pest Control
Stay alert for potential pests. If you notice any signs of infestation, use a mild organic pesticide.
Resolving Common Issues with Common Freesia Transplantation.
When is the best time to transplant common freesia?
The optimal period to move common freesia is between mid-spring and late spring. This provides a strong start before summer.
What distance should be between each transplanted common freesia plant?
Ensure plants are spaced 4-6 inches (10-15 cm) apart. This gives them ample room to grow without competing for nutrients.
Why are my transplanted common freesia wilting soon after transplant?
Transplant shock might be the cause. This often occurs if roots are damaged during the process. Gentle handling is crucial when transplanting common freesia.
What type of soil does common freesia prefer during transplantation?
Common freesia thrives in well-draining soil. Ensure the new location enhances water drainage without retaining excessive moisture.
Should I water common freesia immediately after transplanting?
Yes, watering right after transplantation helps settle the soil around the roots and reduces transplant shock. But remember not to overwater!
How deep should I plant common freesia after transplanting?
The common freesia bulb should be planted approximately 2 inches (5 cm) below the surface. This aids in supporting the plant and encouraging root development.
What precautions should I take when uprooting common freesia for transplanting?
When uprooting common freesia, do so gently to prevent root damage. Also, ensure all bulbs are recovered for successful transplantation.
How should I acclimate common freesia before transplanting?
Begin the acclimation process by gradually exposing common freesia to the outdoor conditions of the new site a week prior to transplant.
Why are my transplanted common freesia not flowering?
This could be due to insufficient sunlight. Common freesia requires full sun to partial shade to bloom properly. Ensure the transplant location meets this need.
When should I fertilize transplanted common freesia?
Fertilize common freesia about 2-3 weeks after transplantation using a balanced plant food. This allows the plant time to establish itself in its new location.


