How to Prune Whorled pennywort?
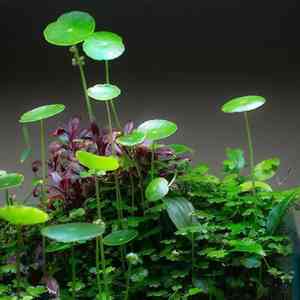
This water-dwelling perennial is distinguished by its round, reniform leaves organized in spirals. Trimming whorled pennywort entails eliminating deceased or compromised leaves and managing its expansion. The ideal periods span from spring to autumn to sustain vitality and avert excessive proliferation. Pruning should ideally be performed with disinfected shears to preclude the transmission of pathogens. Consistent cutting encourages thicker foliage and can restrict its dispersion in sensitive aquatic environments. It contributes positively to both the plant's appearance and its overall well-being.
Advantages of Trimming Whorled Pennywort
Advantages of Trimming Whorled Pennywort
Trimming whorled pennywort promotes more robust development by channeling energy to new shoots and preserving an appealing shape. Consistent cutting helps manage its spread, ensuring whorled pennywort doesn't overshadow nearby flora.
Optimal Time for Pruning Whorled Pennywort
Optimal Time for Pruning Whorled Pennywort
In Spring, whorled pennywort exhibits vigorous growth, making it the perfect period to cut back winter damage and shape the plant before new growth matures too much. Early Summer pruning ensures removal of faded blooms, encouraging a neat look and potential reblooming. Fall pruning aids in size management and the removal of any dead or diseased foliage, preparing whorled pennywort for winter while preventing new growth susceptible to cold damage.
Necessary Tools for Pruning Whorled Pennywort
Bypass Pruners
Whorled pennywort typically has delicate stems that require clean, precise cuts to avoid crushing plant tissue. Bypass pruners are ideal, functioning like scissors with one blade passing the other, providing a clean cut vital for whorled pennywort's healthy regrowth.
Micro-Tip Snips
Given whorled pennywort's fine foliage and compact growth, micro-tip snips are excellent for reaching tight spots and making accurate trims without harming adjacent stems or leaves. Micro-tip snips offer control and precision, especially useful when thinning or shaping whorled pennywort.
Small Garden Scissors
For light shaping of whorled pennywort or removing dead leaves, small garden scissors suffice. They allow for accurate cuts and are perfect for maintaining whorled pennywort's aesthetic growth pattern without causing undue harm.
Gardening Gloves
Though not a cutting tool, wearing gardening gloves during pruning can shield the gardener's hands from moisture and potential pests in whorled pennywort's environment. Gloves also improve tool grip.
How to Prune Whorled Pennywort
Sanitize Tools
Before starting, ensure all pruning implements (like shears and scissors) are clean and disinfected to prevent disease transmission to whorled pennywort.
Remove Diseased Parts
Carefully inspect whorled pennywort for any diseased leaves and branches. Using the sanitized pruning tools, gently cut away these affected parts, taking care not to damage healthy tissue.
Trim Withered Leaves
Identify and remove withered or yellowing leaves from whorled pennywort. Cut close to the base of the leaf stem with a sharp tool to ensure a clean cut without pulling or tearing the plant.
Cut Dead Branches
Examine whorled pennywort for dead branches and prune them back to the point of live growth or to the main stem if the entire branch is dead. Make clean, angled cuts to promote healing and prevent water accumulation.
Final Cleanup
After pruning, gently clear away the trimmed material from the area around whorled pennywort to maintain good air circulation and prevent potential pest or disease issues.
Common Pruning Errors with Whorled Pennywort
Excessive Pruning
New gardeners might remove too much foliage from whorled pennywort, which can stress the plant and reduce its vitality. It's crucial to prune only what's necessary, avoiding cutting more than one-third of the plant at a time.
Incorrect Cutting Technique
Improper cutting methods can damage whorled pennywort's stems, hindering their ability to transport water and nutrients. Always use clean, sharp pruning tools and make angled cuts just above leaf nodes.
Pruning Without Disinfecting Tools
Failing to disinfect pruning tools before and after use can introduce or spread pests and diseases. Disinfection is as important for whorled pennywort as for other plants, especially when pruning multiple specimens.
Pruning Healthy Growth
Mistakenly pruning new, healthy growth instead of only dead or overgrown sections can inhibit the spreading habit characteristic of whorled pennywort. Focus on removing dead or yellowing leaves and overgrown stems to maintain the plant's shape and health.
Ignoring Plant Structure
Both experienced and novice gardeners may overlook whorled pennywort's natural growth pattern when pruning, leading to an imbalance in the plant's shape. Understanding whorled pennywort's structure helps maintain its natural form.
General Pruning Advice for Whorled Pennywort
Identification Of Dead Material
Locate and remove dead, yellow, or damaged leaves and stems to promote healthy growth and prevent potential disease problems. For whorled pennywort, which thrives as ground cover, this helps prevent rot and encourages air circulation.
Encouraging Spread
Prune whorled pennywort's stems to control direction and encourage horizontal spreading. Pinching off stem tips can promote a fuller look as whorled pennywort typically spreads via stolons horizontally.
Thinning Out
Thin out crowded areas to improve light penetration and air flow throughout whorled pennywort. This practice is especially crucial in dense patches to prevent moisture-related problems and support even growth.
Consistency Check
Regularly inspect whorled pennywort and perform light pruning as needed rather than waiting for a major prune. Consistent maintenance helps keep the plant manageable and healthy without causing shock from infrequent, heavy pruning.
Hydrocotyle Rejuvenation
If whorled pennywort becomes too overgrown or leggy, rejuvenation pruning can be employed. Remove older, leggy stems to allow room for new growth, which can lead to a denser and more vibrant plant.


