How to Propagate Coast wallflower?
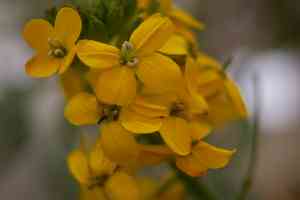
Erysimum menziesii flourishes in seaside habitats, recognized for its brilliant yellow blossoms. For propagation via seeding, verify that the seeds are new and gently blanket them with substrate. Sustain a porous growing medium and keep it damp for peak sprouting. After the young plants are rooted, relocate them to their permanent spot, favoring sandy or highly permeable ground. Consistent irrigation and adequate sunlight will foster robust development and blooming.
When Is the Optimal Time to Propagate Coast Wallflower?
Propagation Method
Seeding
Propagation Period
Spring
What Equipment Is Utilized in Coast Wallflower Propagation?
Seed Tray
Employed for planting coast wallflower seeds. It offers a contained and manageable setting perfect for germination. Divided into cells, it aids in organizing seeds and observing their development.
Seed Compost
Specialized growing medium that provides the correct balance of nutrients, moisture retention, and drainage. Crucial for fostering a nourishing environment for coast wallflower seedlings.
Watering Can with Fine Rose
Ensures gentle irrigation without disturbing the soil or dislodging seeds. Essential for maintaining moisture levels for coast wallflower without causing waterlogging.
Clear Plastic Cover
Helps create a miniature greenhouse effect by trapping humidity and warmth, encouraging consistent germination conditions for coast wallflower seeds.
Plant Labels
Used to mark the planting date and plant species, ensuring precise identification and tracking of coast wallflower throughout the propagation process.
Spray Bottle
Provides a gentle misting option to keep the surface moist without overwatering, vital during the initial stages of coast wallflower seed germination.
Heating Mat
Supplies a controlled heat source beneath the seed tray to maintain optimal soil temperature, accelerating the germination and growth of coast wallflower.
Soil Thermometer
Monitors soil temperature to ensure it stays within the ideal range for coast wallflower seed germination, preventing extremes that could impede growth.
Transplanting Tool
Assists in carefully lifting and relocating young coast wallflower seedlings to pots without harming the delicate roots.
How to Propagate Coast Wallflower?
Propagation Difficulty
Simple
How to Nurture Your Newly Propagated Coast Wallflower?
How to Nurture Your Newly Propagated Coast Wallflower?
Following transplanting, continue to irrigate coast wallflower regularly, especially during dry periods, ensuring the soil remains damp but not saturated. Apply mulch around the plant bases to retain soil moisture and suppress weeds. Protect from strong winds and check for any signs of pests or diseases. Prune dead or damaged foliage to encourage healthy growth and flower production. Fertilize sparingly, as coast wallflower typically thrives in low-nutrient, sandy soils.
Common Errors to Avoid When Propagating Coast Wallflower
Overwatering
Excessive water can lead to root rot, which severely harms the plant and reduces propagation success.
Improper Soil Mix
Using dense, poorly draining soil can result in inadequate root development and stunted growth.
Insufficient Light
A lack of adequate light can cause weak, elongated seedlings that fail to flourish.
Incorrect Cutting Technique
Taking cuttings from unsuitable parts or not using clean, sharp tools can hinder successful rooting.
Neglecting Humidity
Failing to provide a humid environment can cause cuttings to dry out before they establish roots.
Advice For Propagating Coast Wallflower
Drainage
Utilize well-draining soil to prevent water accumulation and subsequent root rot.
Light
Ensure cuttings receive ample indirect sunlight to promote healthy growth without scorching them.
Cuttings
Take cuttings from healthy, non-flowering stems and use clean, sharp tools to improve rooting success.
Humidity
Place cuttings in a humid environment, such as under a plastic dome or in a humid room, to prevent drying out.
Soil Mix
Employ a sandy or gritty soil mix to enhance drainage and mimic coast wallflower's natural habitat.


